
What is better than freshly baked, crusty, artisan sourdough bread?
HOMEMADE freshly baked, crusty, artisan sourdough bread 😜
And so the loaf affair continues ...
In 2020, our exciting experiment of the year was homebrewed kombucha (still love it till this day, although we usually take a break during the winter months), and in 2021 it was the year of foraging and preserving food – or rather the first year of actually implementing it.
For 2022 it was my goal to add something new to our kitchen habits, and that is making our own sourdough bread using our own sourdough starter from scratch!
So today I want to show you how I make my easy artisan sourdough bread that is low in gluten, nutritious, and most important of all, delicious! With a lovely crust and an airy inside ("crumb"), yum!

The main character of this loaf story: a potent sourdough starter.


Beautiful rustic crust.

SIMPLE ARTISAN SOURDOUGH BREAD
Preparation time: 1 hour 30 mins (+ 22 hours resting time)
Main ingredients: sourdough starter, flour, water, salt
difficulty level: easy
makes: 1 loaf of bread
suitable for: vegan, lactose-free, wheat-free, nut-free, yeast-free
for the levain (leaven, pre-ferment or pre-dough):
30-50 g dry sourdough starter
100 g flour (I use spelt flour type 630) *
Step 4: Bulk Ferment
After the final stretching-and-folding, transfer the dough back into the same bowl, and cover with a damp tea towel or a loose fitting lid. Let it sit to proof for about 3 hours, or overnight in the fridge. The dough should increase in size by about 30–50 %.
Step 5: Shape Loaf
After bulk fermenting, gently transfer your dough onto a clean and floured surface, like a cutting board or counter top. Dust your clean hands. Carefully fold the soft dough over itself once from each side to create surface tension.
Next, flip over the ball of dough and use the bottom edge of your floured hands (or your bench scraper) to "pull" the dough down on the sides and underneath itself, pinching the dough together on the bottom, while rotating the ball of dough with each pinch / tuck. This creates more surface tension, but also helps the loaf shape to hold together.


Step 6: Rest & Proof
Transfer the shaped loaf – the pinched side of the dough up! – to a generously floured proofing basket aka banneton which will help the loaf keep its shape while it rises. Alternatively, you can simply use a bowl or a colander with a heavily floured linen towel.
Set aside on the countertop to proof for 30-60 minutes. (Alternatively, place in the fridge covered with a lid or damp towel to proof overnight.)
In the meantime, preheat your oven to 250 °C / 475 °F for 1 hour with your dutch oven or cast iron combo cooker inside. (I actually use a casserole dish.) If you don't have either, place a rack on the bottom shelf with an oven-proof bowl of water on it when baking your bread!
Step 7: Score & Bake
When you're ready to bake the bread, flip the proofing basket onto a piece of parchment paper.
Have you ever made sourdough bread before? What is your favourite recipe? Let me know!
The Bread Baking Schedule:
OPTION 1 – afternoon bread (how I usually do it)
DAY 1 (Friday):
NIGHT: An hour before going to bed, at around 10 p.m., I begin my dough by building the levain. I cover the bowl with a wet tea towel and a plate on top, and set it aside at warm room temperature to do its magic overnight. Then I head off to bed.
DAY 2 (Saturday):
MORNING: As soon as I get up, say 9 a.m., 'cause it's the weekend, I take my bubbly levain and mix it levain with the remaining ingredients to make the main dough. I let it hydrate for 30 minutes, then start stretching-and-folding my dough every 30 minutes for a total of 4 times, so 2 hours.
MID-MORNING: At around 11:30 a.m. my dough is ready to bulk ferment for another hour or two, covered once again with the wet cloth (and plate).
NOON: At around 1 p.m. I shape the bulk fermented dough into a loaf. I place the loaf in a proofing basket, and set aside to proof for another hour. In the meantime, I preheat the oven for 1 hour.
I then bake the bread, and at about 3 p.m. it's ready!
OPTION 2 – bread for breakfast
DAY 1 (Saturday):
11 a.m. Build levain. Cover and set aside at room temperature for 4 hours.
3 p.m. Mix main dough. Cover with wet cloth.
3:30 p.m. Stretch-and-fold dough every 30 minutes, 4 times in total.
5:30 p.m. Bulk ferment for 3 hours, covered with wet cloth.
8:30 p.m. Shape loaf. Place in proofing basket at room temperature, covered with wet cloth.
9 p.m. Place basket in the refrigerator to proof overnight. (Sleep well, little loaf!)
DAY 2 (Sunday):
9 a.m. Take loaf out of the fridge. Preheat oven for 1 hour.
10 a.m. Bake bread.
11 a.m. Enjoy oven-fresh bread for a late breakfast or brunch. (If you want to eat breakfast earlier, you'll just need to get up earlier 😉)
OPTION 3 – bread for dinner
DAY 1 (Monday):
6 p.m. Build levain. Cover and set aside at room temperature for 4 hours.
10 p.m. Mix main dough. Cover with wet cloth.
10:15 p.m. Stretch-and-fold dough every 15 minutes, 4 times in total.
11 p.m. Bulk ferment in the refrigerator overnight, covered with wet cloth and a plate on top. (Sweet dreams, sourdough!)
DAY 2 (Tuesday):
7 a.m. Shape loaf. Put proofing basket in the refrigerator, covered with wet cloth and plate.
5 p.m. Take proofing basket out of the fridge, uncover and set aside at room temperature for 1 hour to warm up. Preheat oven for 1 hour.
6 p.m. Bake bread.
7 p.m. Enjoy oven-warm bread for dinner!
All of these different stages of baking and terms like starter, discard, levain, bulk fermentation, banneton, lame, dutch oven, crumb etc. can seem overwhelming. But don't worry about getting everything "right" the first time. Trust the process! Once you get the hang of it, it's really not that complicated, and most of the time is inactive waiting, with only a couple of minutes of actual work 😊

Preparation time: 1 hour 30 mins (+ 22 hours resting time)
Main ingredients: sourdough starter, flour, water, salt
difficulty level: easy
makes: 1 loaf of bread
suitable for: vegan, lactose-free, wheat-free, nut-free, yeast-free
Ingredients:
for the levain (leaven, pre-ferment or pre-dough):
30-50 g dry sourdough starter
100 g flour (I use spelt flour type 630) *
100 g warm filtered water
OR sub 250 g / 1 cup wet sourdough starter!
for the final dough:
500 g flour of choice *
300 g warm filtered water
15 g salt
also:
a digital kitchen scale
a proofing basket / banneton (alternatively, use a bowl or a colander with a heavily floured linen towel)
(optional but recommended) a dutch oven or cast iron combo cooker (or an oven-proof bowl with water)
(optional) a bread lame, for scoring
* I usually do 200 g whole grain spelt flour, 150 g spelt flour type 630 (all purpose flour), and 150 g spelt flour type 1050 (bread flour); which equals a ratio of 40 % whole grain, 30 % all purpose, and 30 % bread flour.
However, I've also done other ratios such as 450 g spelt flour type 630 (all purpose flour), and 50 g whole grain rye flour; which equals 90 % all purpose, and 10 % whole grain flour. Just experiment, until you find your sweet spot!
Step 2: Mix & Hydrate
To the active levin, add the final dough ingredients: 300 g warm filtered water, 500 g flour of choice, and 15 g of salt. Use a wooden spoon or stiff spatula to combine very well until it forms a rough shaggy dough (see below).
Cover the bowl with a damp tea towel, and set aside for 30 minutes to 2 hours to allow the flour hydrate.
Step 3: Stretch & Fold
It's time to get your hands dirty! Or at least doughy. So first, wash up well – and I suggest also removing any rings, but that's just me. It's best to have wet hands for this.
Uncover your dough, and use a bench scraper to pick up on one side of the dough. Stretch out the dough towards you, making sure not to over-stretch it as this will tear apart the gluten strands – only until you meet resistance. Then fold it over to the middle (see below). Rotate the bowl by one quarter, and pick up the next side of the sough. Pull upwards, and fold over. Stretch, fold, stretch, fold, stretch, fold, and so on. Do that all the way around for one or two rounds, turning the dough by one quarter as you go. Stretch and fold, stretch and fold ...
BONUS TIP: When adding goodies like herbs, nuts, seeds, dried fruit or olives, you can do this during the first set of stretch-and-fold!
OR sub 250 g / 1 cup wet sourdough starter!
for the final dough:
500 g flour of choice *
300 g warm filtered water
15 g salt
also:
a digital kitchen scale
a proofing basket / banneton (alternatively, use a bowl or a colander with a heavily floured linen towel)
(optional but recommended) a dutch oven or cast iron combo cooker (or an oven-proof bowl with water)
(optional) a bread lame, for scoring
* I usually do 200 g whole grain spelt flour, 150 g spelt flour type 630 (all purpose flour), and 150 g spelt flour type 1050 (bread flour); which equals a ratio of 40 % whole grain, 30 % all purpose, and 30 % bread flour.
However, I've also done other ratios such as 450 g spelt flour type 630 (all purpose flour), and 50 g whole grain rye flour; which equals 90 % all purpose, and 10 % whole grain flour. Just experiment, until you find your sweet spot!
Instructions:
Step 1: Build Levain (about 14 hours prior to when you want to bake your bread)
Remove sourdough starter from refrigerator.
To make the levain (aka the pre-ferment or pre-dough) combine 30 g sourdough starter and 100 g warm filtered water in a large non-metallic bowl. Stir using a wooden spoon or silicone spatula until you get a milky frothy mixture.
Remove sourdough starter from refrigerator.
To make the levain (aka the pre-ferment or pre-dough) combine 30 g sourdough starter and 100 g warm filtered water in a large non-metallic bowl. Stir using a wooden spoon or silicone spatula until you get a milky frothy mixture.
To this, add 100 g of flour, and combine with the wooden spoon or spatula. The consistency should resemble a thick pancake batter.
Cover and let sit for 12 hours in a warm place (as little as 4 hours and up to 24 hours is fine), until bubbly and active.
Cover and let sit for 12 hours in a warm place (as little as 4 hours and up to 24 hours is fine), until bubbly and active.
 |
| Nice bubbly levain! |
Step 2: Mix & Hydrate
To the active levin, add the final dough ingredients: 300 g warm filtered water, 500 g flour of choice, and 15 g of salt. Use a wooden spoon or stiff spatula to combine very well until it forms a rough shaggy dough (see below).
Cover the bowl with a damp tea towel, and set aside for 30 minutes to 2 hours to allow the flour hydrate.
 |
| Left: right after mixing. Right: 2 hours later. |
Step 3: Stretch & Fold
It's time to get your hands dirty! Or at least doughy. So first, wash up well – and I suggest also removing any rings, but that's just me. It's best to have wet hands for this.
Uncover your dough, and use a bench scraper to pick up on one side of the dough. Stretch out the dough towards you, making sure not to over-stretch it as this will tear apart the gluten strands – only until you meet resistance. Then fold it over to the middle (see below). Rotate the bowl by one quarter, and pick up the next side of the sough. Pull upwards, and fold over. Stretch, fold, stretch, fold, stretch, fold, and so on. Do that all the way around for one or two rounds, turning the dough by one quarter as you go. Stretch and fold, stretch and fold ...
BONUS TIP: When adding goodies like herbs, nuts, seeds, dried fruit or olives, you can do this during the first set of stretch-and-fold!
Cover the dough again, and let it rest for 30 minutes in a warm place.
Repeat the stretch-and-fold process again. Afterwards, cover the dough and let it rest for another 30 minutes. Repeat this 1 more time, for a total of 4 times. (Perfect for watching a Netflix show or reading in-between!)
With each round of stretch-and-folds you should notice your dough becoming smoother and more elastic.
 |
| Stretch ... |
 |
| ... and fold. |
Step 4: Bulk Ferment
After the final stretching-and-folding, transfer the dough back into the same bowl, and cover with a damp tea towel or a loose fitting lid. Let it sit to proof for about 3 hours, or overnight in the fridge. The dough should increase in size by about 30–50 %.
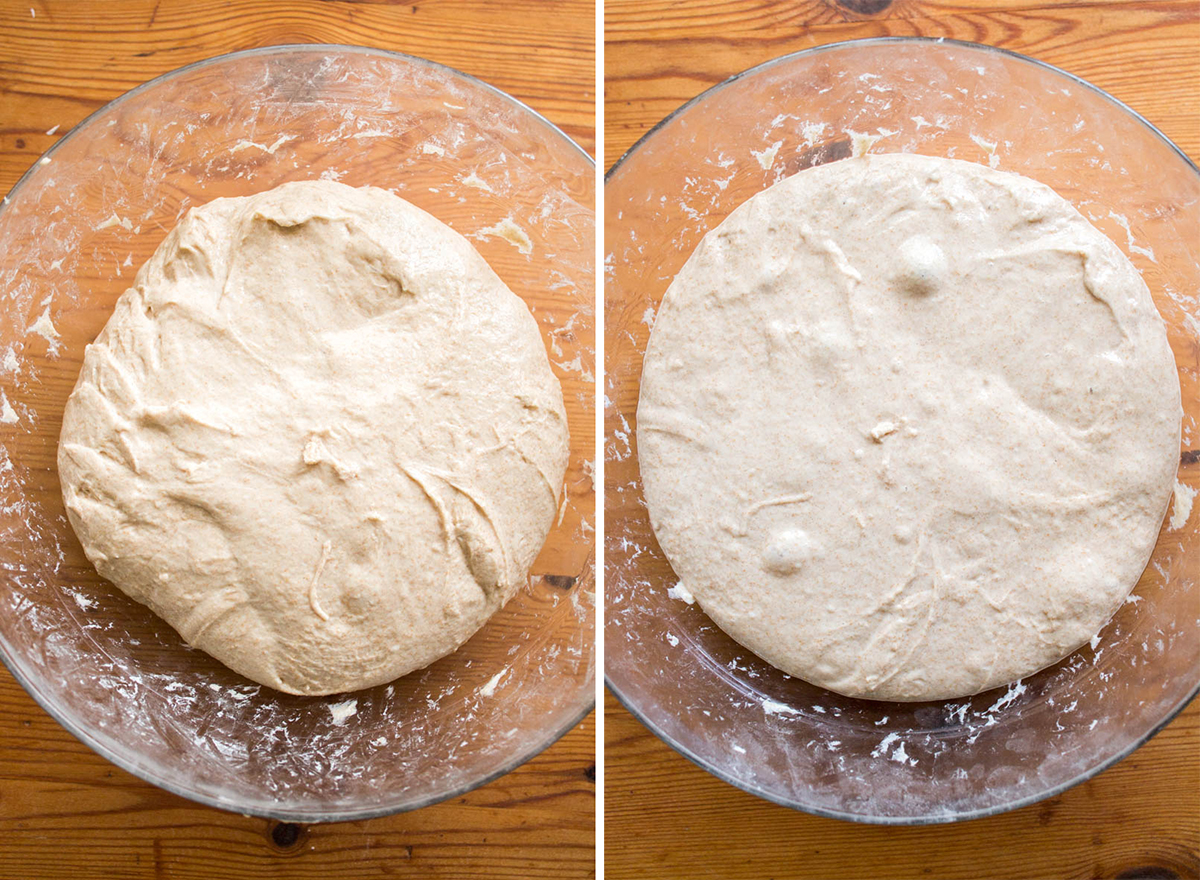 |
| Before and after bulk fermenting. See those bubbles?! |
Step 5: Shape Loaf
After bulk fermenting, gently transfer your dough onto a clean and floured surface, like a cutting board or counter top. Dust your clean hands. Carefully fold the soft dough over itself once from each side to create surface tension.
Next, flip over the ball of dough and use the bottom edge of your floured hands (or your bench scraper) to "pull" the dough down on the sides and underneath itself, pinching the dough together on the bottom, while rotating the ball of dough with each pinch / tuck. This creates more surface tension, but also helps the loaf shape to hold together.


Step 6: Rest & Proof
Transfer the shaped loaf – the pinched side of the dough up! – to a generously floured proofing basket aka banneton which will help the loaf keep its shape while it rises. Alternatively, you can simply use a bowl or a colander with a heavily floured linen towel.
Set aside on the countertop to proof for 30-60 minutes. (Alternatively, place in the fridge covered with a lid or damp towel to proof overnight.)
In the meantime, preheat your oven to 250 °C / 475 °F for 1 hour with your dutch oven or cast iron combo cooker inside. (I actually use a casserole dish.) If you don't have either, place a rack on the bottom shelf with an oven-proof bowl of water on it when baking your bread!
 |
| A well rested loaf in its proofing basket. |
Step 7: Score & Bake
When you're ready to bake the bread, flip the proofing basket onto a piece of parchment paper.
This step is optional but makes for a pretty bread: Score by slashing the floured loaf top with a bread lame (a razor blade with a handle) or a sharp non-serrated knife. Easy options for beginners are a cross, a hashtag, or one or two slashes across the loaf, like I did here. Scoring the bread allows the loaf to expand and prevent the crust from cracking open randomly.
 Before and after scoring.
 Before and after scoring.
Working fast, remove the hot dutch oven or cast iron combo cooker from the preheated oven. Lifting the parchment paper up by the edges, transfer the loaf into the hot dutch oven or combo cooker, careful not to burn yourself.
Put the hot lid back on, and pop the bread in the oven. (Again, if you don't have a dutch oven or combo cooker, place a rack on the bottom shelf with an oven-proof bowl of water on it at this point! This will provide the steam that is needed to get that lovely crisp and golden crust!)
Bake for 30 minutes with the lid on, and then 15-20 minutes without the lid.
Remove from the oven and transfer to a cooling rack for at least 1 hour before slicing. Your bread continues to bake once it is removed from the oven, which results in a nice crumb.
Sliced up warm, and served with butter and a sprinkle of salt on top is honestly one of my favourite way to eat it! So simple, but so delicious.
Store in a breadbox or in a cotton or linen bag for fresh keeping to enjoy throughout the week.
This bread easily keeps for 5-7 days, up to 2 weeks. For longer storage, slice up and keep in the freezer. If it becomes a little dry over time, just toast it – it tastes great.
Of course, don't forget to take your "crumb shot" 😉 If you aren't familiar, this refers to taking a photo of your cut up loaf. The "crumb" is what bakers call the texture and structure of the inside of a loaf of sourdough bread which will often have these characteristic air holes which is known as "open crumb" as opposed to tight or closed crumb.
TIPS & NOTES:
Put the hot lid back on, and pop the bread in the oven. (Again, if you don't have a dutch oven or combo cooker, place a rack on the bottom shelf with an oven-proof bowl of water on it at this point! This will provide the steam that is needed to get that lovely crisp and golden crust!)
Bake for 30 minutes with the lid on, and then 15-20 minutes without the lid.
Remove from the oven and transfer to a cooling rack for at least 1 hour before slicing. Your bread continues to bake once it is removed from the oven, which results in a nice crumb.
Sliced up warm, and served with butter and a sprinkle of salt on top is honestly one of my favourite way to eat it! So simple, but so delicious.
 |
| Fresh out of the oven and still crackling sourdough bread! |
Store in a breadbox or in a cotton or linen bag for fresh keeping to enjoy throughout the week.
This bread easily keeps for 5-7 days, up to 2 weeks. For longer storage, slice up and keep in the freezer. If it becomes a little dry over time, just toast it – it tastes great.
Of course, don't forget to take your "crumb shot" 😉 If you aren't familiar, this refers to taking a photo of your cut up loaf. The "crumb" is what bakers call the texture and structure of the inside of a loaf of sourdough bread which will often have these characteristic air holes which is known as "open crumb" as opposed to tight or closed crumb.
 |
| Crumb shot of my rustic sourdough bread – lots of air pockets 😍 |
TIPS & NOTES:
- If you don't want to make your own sourdough starter at home, you can buy a starter from a
good, trustworthy source such as from Etsy or an online company like Cultures For Health.
Or you are lucky enough to have a friend or family member who already
bakes with sourdough and who might give you a portion of their starter.
- If you're in a pinch, and don't have time to let your dough ferment for 12-24 hours, you can add 2 tsp of dry active yeast and 2 tsp of sugar to your main dough. Knead for about 5 minutes with damp hands, cover and leave to rise in a warm place for 1 to 1.5 hours. That way you still get the benefits of sourdough – but it only takes about 2-4 hours to make!
Other bread recipes to try:
 |
| Homemade German Walnut Bread |
 |
| Homemade Wholegrain Breakfast Bread Rolls |
 |
| Gluten-free Vegan Oat & Seeds Bread (no flour or yeast!) |
Have you ever made sourdough bread before? What is your favourite recipe? Let me know!
♥
Maisy


0 Comments