Homestead Herbs & Healing | holistic living
  • Start Here
  • Homestead
  • Herbs
  • Healing
  • Recipes
    • Breakfast
    • Main Course
    • Dessert
    • Snack
  • DIY
  • Minimalism
  • About Me
reading time: 4 min


This homemade wild herb & garlic butter is bursting with tons of fresh herbs and "weeds" (!), and crushed garlic. It's the perfect quick and easy-to-make homemade condiment to eat with toasted bread, baked or mashed potatoes, grilled vegetables, or even with pasta.

The beautiful thing about making homemade herb butter is that any blend of fresh herbs can be used! If you don't care for parsley, dill, or dandelion, feel free to swap them out for something you enjoy.

In terms of foraging, late spring / early summer is my favourite time of the year! Wild herbs and so-called "weeds" are shooting up everywhere, trees are budding, and birds are chirping their beautiful songs. It's pure joy to go on an extended walk, maybe to a nearby forest or a secluded meadow to pick some edible spring-blooming flowers, herbs, and greens.

And of course, is there anything better and more rewarding than getting your hands dirty and planting your own (balcony / windowsill) garden in return for an abundance of fresh fruits, herbs and vegetables?

My favourite wild herbs and "weeds" to forage for during spring & summer are
- stinging nettles
- dandelions
- daisies
- garlic mustard
- goutweed aka ground elder
- garden sorrel 
- plantain
...

If you are wondering why I use "weeds" in my herbed butter, that's because wild herbs (and any wild plants) which are usually
considered unpleasant "weeds" – like nettle or chickweed – are actually more nutrient-dense and potent than their counterparts! Wildcrafted herbs are also naturally organic and often more chemically diverse. Stinging nettle for example can be used in recipes as a substitute for spinach, but has a wider variety of nutrients, including vitamins A, C and K, as well as several B vitamins, high levels of calcium (822 mg / 1 oz), zinc (0.13 mg), magnesium (243 mg), potassium (496 mg), iron, phosphorus, various fatty acids and polyphenols, and all of the essential amino acids (aka protein)! It's a true superfood. Plus, it's just the most satisfying feeling to go out and harvest your own – free! – food from nature's abundance. It's also a way of re-connecting with Mama Earth :)

General Foraging Guidelines:

  • You should be 100 % certain you are identifying the correct plant. If you do not know what it is, DO NOT eat it! Do not pick if you're in doubt!

  • Don't harvest from contaminated areas such as busy roadsides, near industrial facilities, where dogs pee, along the edges of agricultural fields, old landfill sites etc.

  • Be mindful & harvest sustainably. Only pick from areas that have a plentiful supply, and never more than 1/4 of a plant, ideally only about 5 %.

  • Leave the harvesting area litter-free.


As for "cultivated" herbs, unfortunately I currently only grow a couple of them on my balcony and in-doors: parsley, dill, cilantro, mint and sage. Our rosemary keeps dying on us, so for now we'll only stick to those, but I'm really hoping that we'll be able to grow more herbs such as rosemary, chives, oregano, and basil in our future backyard.

reading time: 3 min


Y'all probably know by know that I  l o v e  the combination of coconut (milk) and mango. It's just the best! If a tropical island was a food, it would be coconut and mangoes 😃

So basically, these popsicles are the frozen version of my beloved sticky rice with mango, or the more toned down coconut rice pudding with mango.

Honestly, flavour-wise I even prefer them to the chocolate coconut fudgesicles I shared last weekend – and I mean, it's chocolate!! 😱 So let's not waste any more time, and let's get started with this healthy homemade popsicle recipe!

reading time: 2 min


We're currently going through our first 35 °C heatwave here in Germany (that's 95 °F if you're wondering), and I'm VERY prone to eating at least one popsicle, if not two during those hot afternoons. To keep my sugar intake at a more healthy level, I try to reach for sugar-free alternatives where ever possible which is why I like to make my own popsicles – or in this case "fudgesicles".

In this case it's up to you: You can either keep these fudgesicles sugar-free (they are very creamy and delicious on their own – J and I had already eaten two plain ones before I took the pictures, hehe), or you can add a bit of sugar by drizzling them with some dark chocolate. Either way, it's way more healthy than those – admittedly yummy – (vegan) store-bought popsicles with about 20–25 g refined sugar per serving. Our popsicles have 0 g refined sugar when omitting the chocolate drizzle, and about 2,5–3 g refined sugar per serving with the chocolate drizzle. So about one-tenth ...

(Also, ignore my ugly non-matching
plastic popsicle sticks, lol. I'm already looking into replacing them with sustainable molds. Those are REALLY pricey though. 40 bucks for 10 stainless steel popsicle molds!!)

 reading time: 3 min


Hello my fellow freckly-banana-lovers!

Honestly, there's nothing better than a bunch of spotty, overly ripe "leopard" bananas. You can freeze them to make smoothies or a variety of nicecreams, or you can mash them easily to make delicious, naturally sweet banana bread or even waffles. The riper the better!

I already have three different banana bread recipes here on my blog, all from ages ago, but I never really strayed from the path of combining bananas with some type of flour, oil and plant milk. So today I want to share something a little more exciting with you, and that's peanut butter chocolate banana bread. With a pretty swirl and a soft crunch from roasted peanuts and a bit of melted sweetness from the chocolate chips.

Only recently have I been made aware that banana bread (along with Dalgona coffee, cloud bread, pancake cereal, and sourdough bread) has become something like a pandemic food trend over the past year or so. Which is weird to me because I made a bunch of banana breads BEFORE the pandemic and NONE at all during the pandemic (until now), but as I mentioned in my blog post on What the Corona Crisis Teaches Us, I think it's great that people start to make their own bread again, or in this case, banana bread. (By the way, this was our sweet sustenance for a lovely canoe trip last weekend!)

So let's get started!

 reading time: 4 min


Last month J and I went foraging for nettles again, and we made this delicious, hearty, cheesy and totally vegan and wheat-free stinging nettle pie! It's easy to make, and even easier when using ready-made pie crust or pastry dough.
 
Here in Germany, wild nettle season is in full swing – and I'm here for it. Late April J and I went nettle foraging for the first time this year and came home with a huge bag of young stinging nettle leaves to make one of my favourite nettle recipes: Wild Garlic Nettle Strudel.

Around that time (when I was looking for Beltane recipes over on Gather Victoria) I coincidentally came across a blog post called The Why of Spring Nettle Pie, and beyond enjoying Danielle's article on re-connecting with our primal relationship to mother nature (who we've abused and poisoned over the past centuries by which we are ultimately harming ourselves), it also inspired me to come up with another stinging nettle recipe: nettle pie! With a nice flakey crust and wild weeds.

Mind you, I've been a huge fan of re-connecting with nature and living a more seasonal, eco-conscious life for a couple of years now, long before stumbling across Danielle's wonderful homepage and becoming slightly obsessed with it, lol (my other two favourite blogs / websites are
Wholehearted Eats and Grow Forage Cook Ferment). My love for gardening, harvesting and homemaking probably started with me planting a few herbs on my windowsill in the city apartment I shared with 4 other lovely humans, then planting an alder tree in the semi-wildernis of my parents' home, and now going out to forage for elderflowers and stinging nettle, dandelion and goutweed to make my own homemade delicious, nutritious recipes and also DIY skincare and herbal medicine from nature's gifts.

Now back to nettles ...

I LOVE stinging nettle! Although most people only know it as a "weed" with a painful sting, stinging nettle is a nutrient-packed superfood
that is particularly high in vitamins A and C, iron, potassium, manganese, and calcium. It is also a very versatile plant – it can be used for skin care, hair care, in smoothies, teas, soups, pesto ... and even as natural fertilizer! If you want to know more about that, check out my blog post on 12 Ways to Use Wild Stinging Nettle. (I also dry it and feed it to my guinea pigs!) Apparently, you can also make things like nettle beer and even nettle cake. I'll need to try that one day ...

But for now, let's – finally – make some nettle pie!


STINGING NETTLE PIE

adapted from Bake My Day Happy

Preparation time:
1 hour 30 mins
Main ingredients: stinging nettle, leek, flour
difficulty level: easy
yields: 8 slices (26 cm- or 10-inch springform pan)
suitable for: vegan, lactose-free, wheat-free, low-fat, sugar-free, yeast-free

Ingredients

Pie crust:
500 g flour (I used 300 g 1050 spelt flour + 200 g whole-grain spelt flour)
150 g vegan butter, chilled
1 tsp salt
about 1/2 cup ice cold water

Filling:
about 1 lb young stinging nettle leaves (the top 4-6 tender leaves)
a handful of brown mushrooms
2-3 spring onions
1 leek (or sub chard or spinach) *
a handful of fresh herbs (dill, thyme, parsley ...) *
1 white onion
2 garlic cloves
2 tbsp vegan butter or olive oil
salt and pepper, to taste
a pinch of nutmeg
1/2 cup grated vegan "cheese" (I use the brand Simply V)
1/4 cup + 1/8 cup soy cream
zest of 1 organic lemon
(optional) 1 tbsp nutritional yeast

*
Feel free to add other spring greens to this pie, such as ramps, dandelion greens, plantain, goutweed, sticky weed, sorrel, arugula ...


Instructions

First prepare the pie crust (or use store-bought):
In the bowl of a food processor, pulse flour and salt. And cubed butter. Pulse a few times until pea-sized pieces form. Slowly add 1 tbsp of water at a time, stopping when you fill up your spoon with water.
Pulse and continue to add water until a ball has just formed with the dough.
Turn out the dough onto a lightly floured surface. Cut the ball of dough in half. Roll out dough on top of plastic wrap, one ball at a time, to form the crust. Turn out dough into your pie pan and shape the edges by pushing your thumb of one hand into the thumb and pointer finger of your other hand on opposite edges of the dough and work all the way around.

For the pie filling, thoroughly rinse nettle leaves under running water (or fill a clean sink with cold water and swish your nettles around in there with tongs to get them as clean as you can muster). Bring some hot water to a boil and drop stinging nettles inside to quickly blanch, about 10 seconds or so. This takes away the stinging properties of the nettles! Place in a colander, and press down to drain any remaining water. Give them a rough chop, removing any tough stems, and set aside.

Finely chop onion and garlic. Chop up brown mushrooms. Sauté onions and garlic in vegan butter or olive oil over medium heat, then add chopped mushrooms. When everything starts to get translucent and aromatic, add washed and chopped leek to the pan. Lastly, add chopped spring onions, blanched nettles, and herbs. Sauté
for about 5 minutes.

Once everything has shrunk together, switch off heat. Mix in soy cream, lemon zest and – optionally – nutritional yeast. Season with nutmeg, salt and pepper.

Preheat oven to 350 °F / 180 °C.
 
Divide pie crust in 2 parts and roll it thin at the size of your pie dish (I use a 26 cm- or 10-inch springform pan). Grease the dish and line with one of the rolled out pie crust circles. Pre-cook pie crust for 15-20 minutes until golden brown. (or skip this step and prolong the overall baking time)

Pour the nettle filling into pie crust, then cover with remaining pie crust and crimp the edges. Cut slits in top, and lightly brush with vegan butter.

Bake for about 50 to 60 minutes or until the pie crust is golden brown and the filling is bubbly.

Place the pan on a cooling rack and allow the pie to cool for about 10 minutes until warm (not hot) before cutting and serving. Serve plain or with a nice salad. E
njoy while still warm!


General Foraging Guidelines:
  • You should be 100 % certain you are identifying the correct plant. If you do not know what it is, DO NOT eat it! Do not pick if you're in doubt!

  • Don't harvest from contaminated areas such as busy roadsides, near industrial facilities, where dogs pee, along the edges of agricultural fields, old landfill sites etc.

  • Be mindful & harvest sustainably. Only pick from areas that have a plentiful supply, and never more than 1/4 of a plant, ideally only about 5 %.

  • Leave the harvesting area litter-free.


Looking for more nettle recipes?
Check out my blogpost on 12 Ways to Use Wild Stinging Nettle:


12 Ways to use Stinging Nettle


♥

Maisy

 reading time: 8 min


So, first off: What exactly is kombucha? I've recently published a looong blog post all about the health benefits, general tips and troubleshooting instructions for making and utilizing kombucha, so make sure to check that out first!

But in a nutshell, kombucha is a refreshing and delicious fizzy fermented tea with numerous health benefits that is served cold. It is made through a double-fermentation process (don't let that intimidate you!) with the aid of a SCOBY, a Symbiotic Culture Of Bacteria and Yeast.

The good news is, once you've got the hang of it, kombucha is extremely easy to make at home and only costs a fraction of the price compared to store-bought kombucha! It kind of makes you feel like a little (al)chemist or a kitchen witch with all that brewing and fermenting :)

The method I use for making my own kombucha is batch brewing, meaning I always make one batch at a time versus continuous brewing. This method is straight-forward and perfect for beginners! (And for people who don't want to make kombucha all the time for the rest of their life, lol.)


Scroll down for my recipe + step-by-step guide with pictures to learn how to prepare your own kombucha (batch brewing) at home!

What You Will Need: 

for making kombucha / 1st fermentation:

- a SCOBY
(Symbiotic Culture Of Bacteria and Yeast; homemade from previous batch of kombucha, given by friend, or purchased online from a reliable source)
- starter liquid (either
unpasteurized, unflavoured store-bought kombucha or leftovers from a previous batch)
- tea (black tea is best for starters, but green tea, rooibos tea and even fruity teas work as well with a larger SCOBY; only use tea without aromatic oils, so no Earl Grey etc.!)
- granulated sugar (e.g. white sugar, brown sugar, cane sugar)
- filtered tap water
- 
a wide mouth glass or ceramic container (should hold between 1 liter and 1 gallon/3.7 liters; preferably with a spigot, either made of plastic or stainless steel!)
- a tightly woven cloth (e. g. gauze, coffee filter, napkin or a dish towel;
apparently cheese cloth is not effective at keeping fruit flies out!)
- a rubber band
- a large pot for brewing tea
- about 1 hour of time every week or two


for bottling + 2nd fermentation:

- a sieve
- a funnel
- several airtight bottles, ideally with flip flop lids *
- (optional) fruits, herbs and/or spices of your choice


* I used a bunch of recycled bottles from store-bought cider and other fruit wines which I sterilized with boiling water, some natural dish soap and vinegar; another way to sterilize your bottles is to put them in an oven on low heat of 110 °C / 230 °F for around ten minutes – if it is too hot, they'll crack!


The Recipe:

HOMEMADE KOMBUCHA


Preparation time: 70 mins + 7 days fermenting
Main ingredients: SCOBY, black or green tea, sugar
difficulty level: easy-moderate
makes: 4.5 litres kombucha
suitable for: vegan, lactose-free, gluten-free, nut-free, soy-free, low-fat

Ingredients

general guidelines:
1 SCOBY

10 to 20 % (of the total amount of water using) starter liquid
8 g organic tea per liter (of water using), either loose or tea bags
50 to 100 g granulated sugar per liter (of water using)
filtered water

my specific recipe:
1 SCOBY (mine is about 600 g by now)
800 ml (
~ 3 1/2 cups) starter liquid (from the previous brew)
40 g (~ 8 tbsp or 16 bags) organic loose black or green tea (in my case it's a Darjeeling first flush)
300 g (~ 1 1/2 cups) cane sugar
3 liters (12 cups) of boiling filtered water
2 liters (8 cups) of cold filtered water

This recipe makes about 4.25 liters (~ 1.1 gallons) of kombucha!  Scale up or down to make as much as you need.


Instructions

Part 1: First Fermentation

Gather your supplies: a large glass container (the size depends on how much you want to make – in my case it's a 2 gallon container with a stainless steel spigot, but I usually fill it with only 1.3 gallons of tea), a SCOBY, starter liquid, sugar, and tea. Make sure your supplies are clean (just use hot water and a splash of white vinegar to "sterilize" them).

If your SCOBY and mature liquid / starter tea are still in their fermentation container from the previous batch, gently take it out with very clean hands, and transfer to an equally clean glass or bowl, along with the liquid. Cover with a clean plate or cloth.

Prepare the sweet tea. Bring filtered water to a boil. Steep organic loose tea or tea bags in hot water for 10-12 minutes.

Strain tea. Discard OR – much better – place the tea leaves on a baking tray to dry and save for the next round of making kombucha (I just blend them with "fresh" tea, or just steep the tea a little longer). Alternatively, black tea leaves make for a great natural fertilizer, so just mix it into the soil in your backyard or give it to your indoor plants!

In the meantime, clean your glass container if it isn't already clean. I use hot water and white vinegar (mature kombucha works as well) to "sterilize" mine. If yours has a spigot like mine, be very careful not to break it!

Fully dissolve sugar in hot tea. I use a stainless steel spoon for this.

Assemble the brew. Transfer cold filtered tap water in the glass container. Then transfer sweet tea mixture into the glass container, on top of the cold water.

Set aside to cool until the mixture to about room temperature. During that time, cover the container with a clean kitchen towel to prevent anything from contaminating your tea mixture.
Don't be impatient here – hot water will kill your SCOBY! Like all yeasts, it must not be heated above 30 ° C, otherwise it will die.

Once the tea mixture has cooled down, gently slide your SCOBY into the glass container with very clean hands. (I usually remove a few layers every other batch of so as to not let the SCOBY get too thick.) The SCOBY will eventually float to the top of the jar – don't worry if it doesn't.

Also add your starter liquid to the glass container.

Ferment. Hooray, the hard part is over! Your brew is now ready to ferment! :)

Cover the "mouth" of the glass container with a tightly woven clean cloth or kitchen towel and secure with a rubber band. The kombucha needs to breathe, but we don't want any contamination like dust, mold spores, or fruit flies inside.

Set the container somewhere warm (ideal room temperature: 70-75 °F / 21-24 °C), dark and undisturbed for 7 to 14 days. A brand new kombucha might even take up to 21 days to ferment. Ambient room light is fine, but avoid direct sun rays.

The warmer the room temperature, the faster the kombucha will ferment. The longer the tea ferments, the more sugar will be eaten up by the SCOBY (this lil' sugar monster!), and the less sweet the kombucha will be.

It's best to begin tasting at about day 6 – this is where a spigot comes in handy. Otherwise, use a stainless steel spoon or a ladle to taste your kombucha (obviously, clean it before dipping it in again!). The taste you're looking for is a slightly sweet, slightly fruity, slightly tart with a mild vinegary hint, but far less than in apple cider vinegar for example. You'll definitely notice a "sweet spot" during the process.

TIP: Write down the date you started the fermentation process because you will forget!

Part 2
: Bottling / Second Fermentation
 
Once your kombucha has fermented to your ideal tartness, it is time to get it bottled!

BTW: You will probably notice that a thin layer has formed on top of the original SCOBY. Don't freak out – that is a new baby SCOBY that can either stay where it is (that way your SCOBY will get bigger and more potent), or you can use it to make a different batch of kombucha in a separate container, for example with green tea. Or give it to a friend to start their own kombucha brewing station!

Bottle your kombucha. Fill the finished beverage into clean, sterilized bottles using a funnel. For plain, unflavoured kombucha
I usually also use a fine mesh sieve to filter out any stringy bits of yeast – don't strain them yet when continuing with second fermentation, as those will help with carbonation and fizz. Leave about a half inch or 1.5 cm of head room in each bottle. (If you want to add any flavours, leave about 1.5 inches or 4 cm at the top!)

Make sure to reserve about 10 % or at least 2 cups of your mature kombucha from this batch to use as a starter liquid for your next for your next round.

Store bottled kombucha in the fridge to prevent any further fermentation and carbonation. (Or, go to the optional 2nd Fermentation, first!)

Begin the brewing cycle again to make your next batch of homemade kombucha, starting at Step 1.

Optional: Add flavour to your "booch"! This is one of the most fun parts of making your own kombucha – coming up with various flavour combinations! This "second
(and final) fermentation" is where you add fruits, herbs and/or spices to your "first fermentation", aka your freshly bottled kombucha. Just throw in a handful of your favourite fruit, chopped and slightly crushed, to let out the juices.

I will do a separate blog post on delicious flavours soon, but some of my current favourites include ginger, lemon & ginger, strawberries, lavender, and sage.

This is a great way to utilize overripe or damaged fruit instead of composting it!

Store kombucha in a dark place at room temperature for 3 to 7 days for 2nd fermentation – you can tell it's ready when there is a noticeable
hissing/fizzing noise when quickly lifting the lid! (don't open the bottle all the way or for very long, or you'll lose a lot of that carbonation) To prevent your bottles from exploding from the pressure of carbonation, definitely "blurp" your bottles by opening them to release some pressure.

Once the 2nd fermentation is done, strain out any fruit or herbs (to prevent moulding). Place strained flavoured kombucha in the fridge to stop any further fermentation.

Drink chilled or at room temperature.


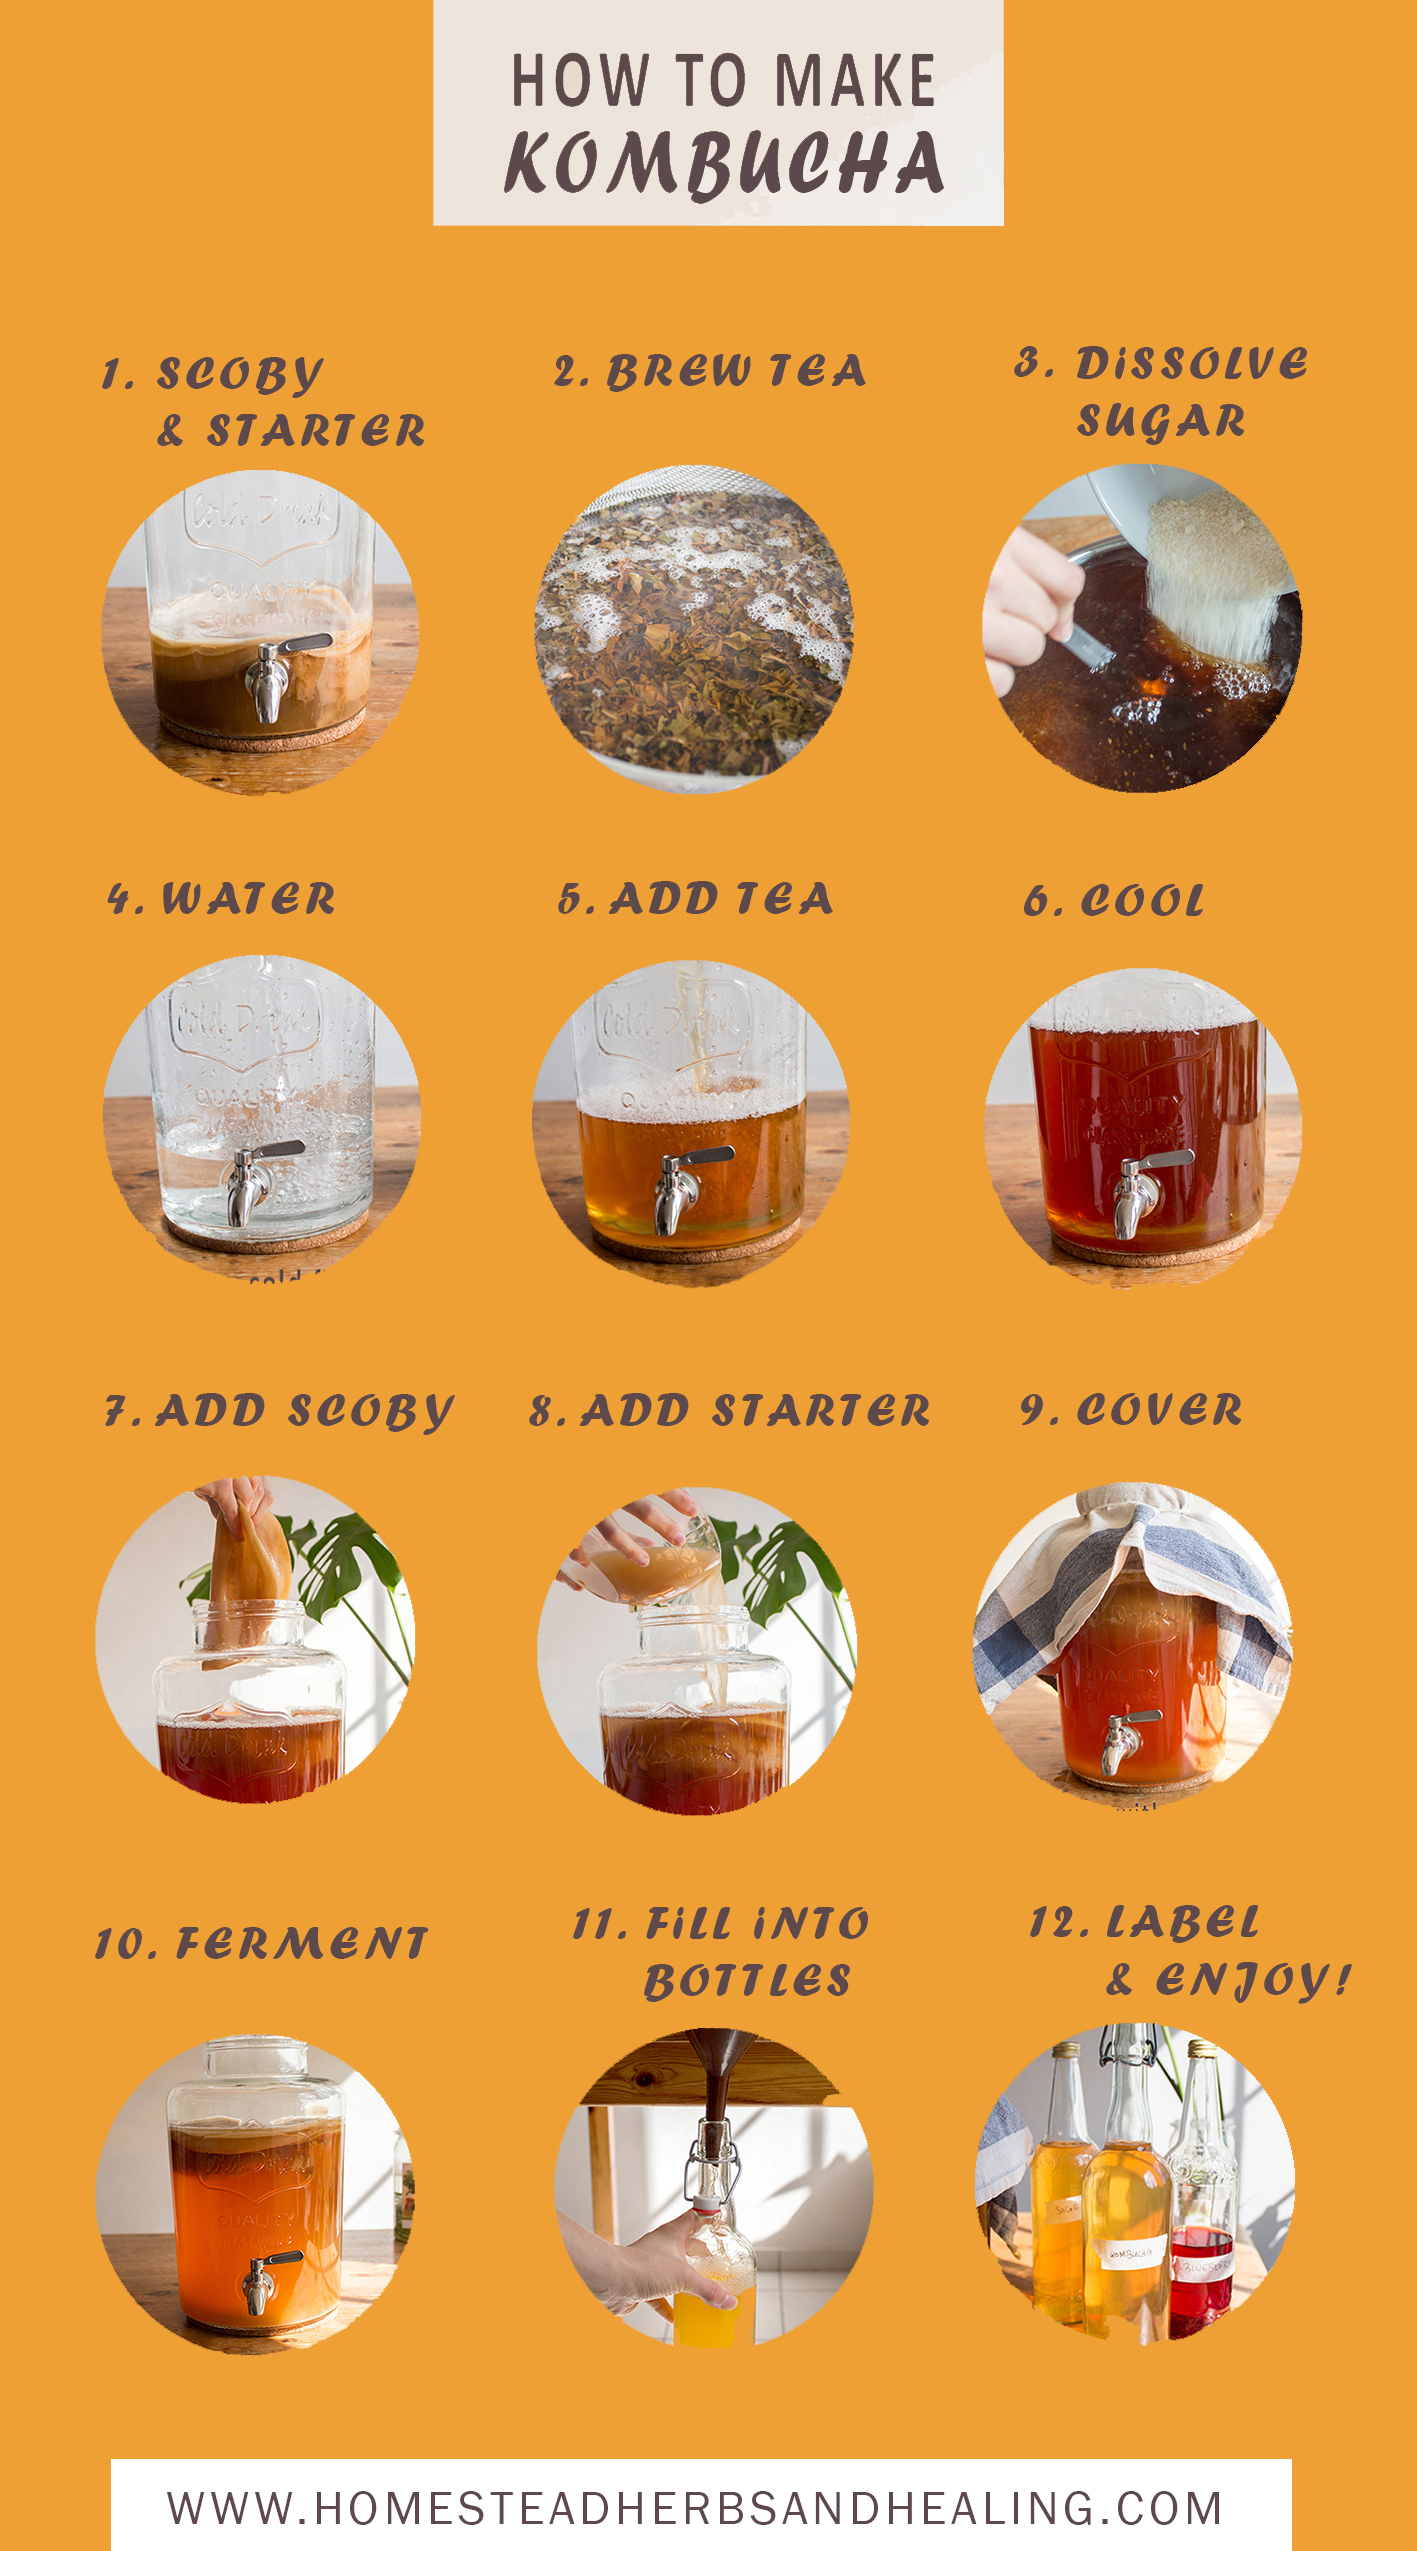
Step-by-Step Guide with Pictures


1st FERMENTATION:


Step 1.
Gather your equipment: a large glass container (in my case a 2 gallon container with a stainless steel spigot), a SCOBY, starter liquid, sugar, and tea.

If your SCOBY and (starter) liquid is still in its fermentation container from the previous brew, gently take it out with very clean hands, and transfer to an equally clean bowl. Cover with a clean plate or cloth.


Step 2.
Bring filtered water to a boil. Steep loose tea or tea bags in hot water for 10 minutes.


Step 3.
After 10 minutes of steeping, s
train tea. Discard tea leaves OR - way better - place on a baking tray to dry and save for the next round of kombucha making. Alternatively, dried black tea leaves make for a great natural fertilizer, so just mix it into the soil in your backyard or give it to your indoor plants!

In the meantime, clean and sterilize your glass container if it isn't already clean. I use boiling water and white vinegar (or even kombucha) to sterilize mine. If yours has a spigot like mine, be very careful not to break it!


Step 4.
Dissolve sugar in hot tea. I use a stainless steel spoon for this.


Step 5.
Transfer filtered water into the glass container.


Step 6.

Transfer tea sugar mixture into the glass container, on top of the cold filtered water.


Step 7.

Set aside to cool until the mixture to about room temperature. Cover with a clean kitchen towel to prevent anything from contaminating your tea mixture!

Don't be impatient here – hot water will kill your SCOBY!


Step 8.
Once the tea mixture has cooled down, transfer your SCOBY to the glass container with very clean hands.


Step 9.
Add your starter liquid to the glass container.


Step 10.
Hooray, the hard part is over! Your brew is now ready to ferment! :)

Cover the glass container with a clean cloth and secure with a rubber band. Set the container somewhere warm (ideal room temperature: 70-75 °F / 21-24 °C) and not in direct sunlight for 5 to 14 days, a new kombucha might even take up to 21 days to ferment. The warmer the room temperature, the faster the kombucha will ferment. The longer the tea ferments, the more sugar will be eaten up by the SCOBY, and the less sweet the kombucha will be.

It's best to begin tasting at about day 6 – this is where a spigot comes in handy. The taste you're looking for is slightly sweet, slightly fruity, slightly tart with a mild vinegary hint, but far less than in apple cider vinegar for example. Maybe more like a fizzy ginger-ale.

TIP: Write down the date you started the fermentation process because you will forget! That way it's easy to track the fermentation.


BOTTLING / 2nd FERMENTATION:


After 7 to 21 days your kombucha should be ready!

You will probably notice that a thin layer
has formed on top of the original SCOBY – that is a new baby SCOBY that can either stay where it is (that way your SCOBY will get bigger and more potent), or you can use it to make a different batch of kombucha in a separate container, for example with green tea. Or give it to friends to start their own kombucha brewing station!


Step 11.
Fill kombucha into clean bottles using a funnel. (If you want to add any flavours, make sure to leave about 1 1/2 inches or 4 cm at the top!) Make sure to reserve about 10 % or at least 2 cups of mature kombucha from this batch to use as a starter tea for your next for your next round!

Store bottled kombucha in the fridge to prevent any further fermentation and carbonation. (Or, go to Step 12: 2nd Fermentation, first!)


Using your leftover kombucha as starter liquid, begin the brewing cycle again to make your next batch of homemade kombucha, starting at Step 1.

And then the whole process starts over. And over … (so yeah, maybe we do become slaves / addicted to making kombucha all the time for the rest of our lives after all, lol!)


Optional Step 12:
This "second fermentation" is where you add fruits, herbs and/or spices to your "first fermentation", aka your freshly bottled kombucha. Try things like ginger, lemon & ginger, strawberries, peaches, or even lavender and sage.

This is a great way to utilize overripe or damaged fruit instead of composting it!

Store kombucha in a dark place at room temperature for 3 to 7 days
for 2nd fermentation – you can tell it's ready when there is a noticeable hissing/fizzing noise when quickly lifting the lid! (don't open the bottle all the way or for very long, or you'll lose a lot of that lovely carbonation)
 
Strain out fruit after 3 to 7 days of fermenting (to prevent moulding). Place strained flavoured kombucha in the fridge to stop any further fermentation. Drink chilled or at room temperature.


One day later ... As you can see, most of the fruit pieces have sunk to the bottom of the bottles, the berries have stained the tea a pretty pink-red and purple, and the plain kombucha has been tapped already ;)


I hope this blog post inspires you to dabble in booch-brewing yourself. Once you've got the hang of it, it's really not that difficult, and not very time-consuming either.

Happy brewing!


♥

Maisy


Newer Posts Older Posts Home

THIS IS ME

Well, hello! My name is Maisy (pronounce: macy) and I’m the creative spirit behind this blog. You are welcome to join me on my journey to a more natural, slow-paced & healthier life!

SUBSCRIBE & FOLLOW

TRENDING THIS MONTH

  • How To Marie Kondo Your Life (and not just your stuff)
  • Hot Wintry Butterbeer (vegan)
  • DIY Easy Electroculture Plant Antenna
  • Ayurvedic Breakfast Porridge (+ the best granola topping ever!)
  • Healthy Banana Split Brownies (vegan)

Categories

  • Ayurveda 17
  • beauty 39
  • breakfast 71
  • dessert 204
  • diy 48
  • fermenting 6
  • fictional food 19
  • foraging 25
  • gardening 8
  • gluten-free 128
  • healing 67
  • herbs 21
  • homestead 109
  • main course 43
  • minimalism 38
  • snack 100
  • sugar-free 112
  • zero waste 44

GET IN TOUCH

Name

Email *

Message *

Powered by Blogger.

Archive

  • ►  2023 (9)
    • ►  March (3)
    • ►  February (3)
    • ►  January (3)
  • ►  2022 (65)
    • ►  December (5)
    • ►  November (3)
    • ►  October (5)
    • ►  September (5)
    • ►  August (6)
    • ►  July (6)
    • ►  June (4)
    • ►  May (6)
    • ►  April (5)
    • ►  March (7)
    • ►  February (7)
    • ►  January (6)
  • ▼  2021 (60)
    • ►  December (5)
    • ►  November (6)
    • ►  October (6)
    • ►  September (8)
    • ►  August (6)
    • ►  July (7)
    • ▼  June (6)
      • Wild Herb & Garlic Butter (using »weeds«)
      • Tropical Coconut Popsicles (vegan)
      • Creamy Chocolate Coconut Fudgesicles (vegan)
      • Peanut Chocolate Swirl Banana Bread (vegan)
      • Vegan Stinging Nettle Pie
      • How to Make Kombucha (batch brewing)
    • ►  May (5)
    • ►  April (4)
    • ►  March (3)
    • ►  February (3)
    • ►  January (1)
  • ►  2020 (22)
    • ►  December (1)
    • ►  July (1)
    • ►  June (4)
    • ►  May (6)
    • ►  April (1)
    • ►  March (2)
    • ►  February (5)
    • ►  January (2)
  • ►  2019 (22)
    • ►  December (2)
    • ►  October (4)
    • ►  September (4)
    • ►  August (3)
    • ►  June (2)
    • ►  April (2)
    • ►  March (2)
    • ►  February (1)
    • ►  January (2)
  • ►  2018 (68)
    • ►  December (1)
    • ►  November (2)
    • ►  October (1)
    • ►  September (4)
    • ►  August (2)
    • ►  July (10)
    • ►  June (4)
    • ►  May (5)
    • ►  April (8)
    • ►  March (12)
    • ►  February (8)
    • ►  January (11)
  • ►  2017 (154)
    • ►  December (13)
    • ►  November (10)
    • ►  October (35)
    • ►  September (13)
    • ►  August (11)
    • ►  July (9)
    • ►  June (1)
    • ►  May (13)
    • ►  April (13)
    • ►  March (16)
    • ►  February (11)
    • ►  January (9)
  • ►  2016 (101)
    • ►  December (9)
    • ►  November (13)
    • ►  October (9)
    • ►  September (12)
    • ►  August (9)
    • ►  July (14)
    • ►  June (9)
    • ►  May (6)
    • ►  April (7)
    • ►  March (3)
    • ►  February (5)
    • ►  January (5)
  • ►  2015 (75)
    • ►  December (6)
    • ►  November (2)
    • ►  October (2)
    • ►  September (7)
    • ►  August (2)
    • ►  July (24)
    • ►  June (6)
    • ►  May (6)
    • ►  April (5)
    • ►  March (8)
    • ►  February (6)
    • ►  January (1)
  • ►  2014 (41)
    • ►  December (2)
    • ►  November (2)
    • ►  October (2)
    • ►  August (2)
    • ►  July (15)
    • ►  June (3)
    • ►  May (4)
    • ►  April (6)
    • ►  March (2)
    • ►  February (3)
  • ►  2013 (7)
    • ►  December (2)
    • ►  October (1)
    • ►  September (3)
    • ►  June (1)

SEARCH THIS BLOG


total page views

Most Popular Posts

  • Dark Chocolate Avocado Brownies (vegan & gluten-free)
  • 12 Easy Hairstyles For Shoulder Length Hair | Long Bob
  • Ayurvedic Breakfast Porridge (+ the best granola topping ever!)

Privacy Policy


Copyright © Homestead Herbs & Healing | holistic living. Designed by OddThemes