reading time: 13 min
Are you itching to grow your own veggies, but don't have a garden? Or maybe you do have a garden, but the native soil quality in your area isn't great (too rocky, too sandy, too clayey …), or you have an issue with moles, rabbits, voles, gophers in your backyard … or, let's face it, you just don't want to strain your back and knees hunching over the low-lying garden beds all the time …
Make way for the raised garden bed!
Ever since moving out of my parents' house twelve years ago, I haven't had the luxury of a garden to call my own. Most of the time I lived in shared flats, and it was only four years ago that I moved into a shared house that came with a pretty big roof terrace. Since we don't have any lawn or dirt up
there, we've had to make do with lots of planters and raised garden beds. Or until recently, only one raised bed.
So I decided that another one was called for.

 ... versus what the old raised bed looks like now, compared to the new one. What was once a sea of Swiss chard is now drowning in calendulas, lol!
Plus, making your own raised garden bed(s) is very easy – and not very expensive!
But see for yourself ...
- (optional) 1 wooden pallet to allow drainage (mine measures 120 cm x 80 cm x 13.5 cm / 47 x 31.5 x 5.3 inches – not needed when placing the bed on soil or lawn)
- 6 cedar or fir boards the length of the pallet (mine are 120 cm x 11 cm / 47 inches x 4.3 inches)
- 6 cedar or fir boards the width of the pallet (mine are 80 cm x 11 cm / 31.5 x 4.3 inches)
- 4 cedar or fir posts (either the height of your raised bed, which in my case would be 46.5 cm / 18 inches, or higher – I chose to make them stick out, so they are about 55 cm / 21 inches long)
- hardware cloth or garden fleece that matches the floorspace of your raised bed (mine is 120 x 80 cm / 47 x 31.5 inches)
- pool liner or dimpled sheet enough to cover the inside walls of your raised bed (in my case 400 cm x 33 cm / 157.5 inches x 13 inches)
- 52 screws (mine are 2.5 cm / 1 inch long)
- 8 screws (mine are 7 cm / 2.7 inches long)
- (optional) 24 nails (I used roofing nails – only needed when using dimpled sheet)
- power drill
- screwdriver
- staple gun
- measuring tape
- pencil
- straight edge
- sandpaper or sanding machine
- work gloves
- safety glasses
- (optional) hammer (only needed when using dimpled sheet)
- (optional) jigsaw (only needed to cut your boards/posts)
HOW
TO MAKE YOUR OWN RAISED GARDEN BED (10 Steps):
Step 1 – Gather all of your supplies and tools
Make sure you have all your materials and tools ready. I actually decided to
tackle this project on the spur of the moment, and luckily we had all the
necessary supplies for the garden bed frame at hand.
Charge your drill, if it's battery-powered. Do you have something to drink
nearby? Then let’s get started!

Do the pieces fit together, or is there some trimming to be done? Do you have enough space to work?
In my case, I happened to have 6 wooden boards that measured 200 cm / 78.8 inches, so exactly the length I needed to produce 6 boards 120 cm / 47 inches in length (for the long sides aka “front” and “back”), and 6 boards 80 cm / 31.5 inches in length (for the short sides). These would all be attached to the 4 posts that in turn were to be screwed to the pallet.
Step 3 – Cut wooden boards and posts to the right length (if they aren’t
already)
If you, like me, weren’t able to have your boards and posts cut to the right length
at your local hardware store, you will have to cut them accordingly now, using
a jigsaw. Layout and measure
again to make sure you’ve got everything at the right length.
Sand down the edges and corners of your wood using sand paper or a sanding
machine, if necessary. You don’t want to have any splinters left on your
boards.
Using a measuring tape and a pencil, measure and mark where your holes need to be. I drilled 2 holes into each post, where it made contact with the pallet, and 4 holes per board, where they made contact with the posts – except for the 2 top boards at the “front” and the “back” which got an additional fifth and sixth hole for more stability.
Drill straight down into the wood and try to keep it as level as possible.

 Drilled holes into the boards. You can see we've already started to attach the posts to the pallet as well.
Step 5 – Attach posts to the pallet
Install the four posts in each corner. They will ensure that the
planter doesn’t slip from the pallet.
For
every hole you drilled into your posts, you will need to insert a long screw
that will go through the posts and into the pallet, so 8 screws in total. I
used 7 cm / 2.7 inch screws.
Again,
do your best to screw straight into the holes, keeping it as level as possible.

Step 6 – Attach boards to the posts
Once the posts are fastened, take your first set of three 120 cm / 47 inches long boards (for the “front”).
I used
2.5 cm / 1 inch screws to screw the boards onto the two “front” posts from
the inside, one at a time, starting at the bottom (4 screws for the lower
two boards, 6 for the top board).
 2 screws on the two bottom boards, and 3 screws for more stability on the top board.
Repeat on the other side with the other three 120 cm / 47 inches long boards (for the “back”).

Next, attach 3 of the shorter boards (80 cm / 31.5 inches) to one of the short sides, screwing them onto the posts from the outside this time.

 The short sides are attached to the posts from the outside, as opposed to the long sides.
Repeat on the other side with the remaining three 80 cm / 31.5 inches long boards.
Already looks like a pretty neat garden bed, eh?
 Yay, a raised bed!
Step
7 – Attach hardware cloth or garden fleece to the bottom of the planter
Now that the frame is done, it’s time to prepare the inside. Depending
on whether you have gophers, voles, or other troublemakers in your area, you will
need to use a hardware cloth or something similarly sturdy to keep off those
nibblers!
If your bed will be placed on concrete or your patio (like our roof
terrace), you won’t need any wiring – something like the garden fleece I'm using will suffice.
If aggressive weeds are a concern, add a layer of weed-blocking landscape
fabric as well.
Whatever you choose to line the bottom of your planter, make sure it’s
water-permeable to allow for drainage! Never seal off the bottom of the planter.
Use a heavy-duty staple gun (or wide head cabinet screws) to attach the wire
or fleece to the pallet and/or the bottom sides of the bed, all along the
edges.
Alternatively, flip the garden bed frame upside down, and attach the wire or fleece
to the bottom edge of the bed.
OPTIONAL MEASURES FOR LONGEVITY:
- Consider adding a mending brace or a thin wood slat each to your long
sides to support the boards and prevent them from bowing with time!
- If you want to prolong the
lifespan of your garden bed, it’s best to seal the wood from the outside and
the inside using a non-toxic wood sealer or natural tung oil.
- And if you want to go the
extra mile, consider sealing the gaps between the boards using clear silicone.
 On day 2 we attached the garden fleece to the bottom. When placing your raised bed on soil/lawn, make sure to use hardware cloth instead or in addition to this!
Step
8 – Attach pool liner to the sides of the planter
To
prevent the wood from rotting over time (and also prevent any leaching of
chemicals from treated wood into the soil), I highly recommend lining the sides
of the garden bed with pool liner or dimpled sheet (dimples facing toward the
boards). Use a staple gun to attach the liner to the wood, going all along the top edges, or use roofing nails to secure the dimpled sheet.
And ta-da! You’ve just built your own shiny new raised garden bed!! (Well,
more or less shiny if you use an old pallet and old posts like I did, haha!)
 We used dimpled sheet and roofing nails to line the inside of our raised bed.
Step
9 – Place in the right location (if it isn’t already)
The
last – well, second to last – thing to do is put the raised bed in place.
Definitely do this before filling because by then this thing will be heavy!!
It’s
best to choose a location that is as level as possible, and receives full sun (or
as much as possible). Also, keep in mind that your raised bed might cast a shadow
on its surroundings, so make sure nothing is unfavourably shaded by it.
Step
10 – Fill your planter
Now
comes the fun part: Filling the planter with all sorts of goodies! Since most common
vegetable plants need a minimum of 30 cm / 12 inches of soil to thrive, your
raised bed should have a minimum depth of said 30 cm / 12 inches (or even
better 45 cm / 18 inches).
In our case, the soil depth comes up to 33 cm / 13 inches, so all good.
 |
| Different layers of soil in a raised garden bed. (source) |
The other important thing to know is that you don't want to put "potting soil" only into your planter. Instead, you want to make sure to put in 4 layers of filling (which should be replaced every 5 years):
- 1st layer (about 1/3 of the planter volume, so about 10 cm / 4 inches): coarse airy wood waste layer as drainage such as thin branches, twigs, shrub waste, rootstocks, wood chippings
- 2nd layer (about 5 cm / 2 inches high): thin layer of chopped branches, leaves, turned sods, lawn clippings, plant residues
- 3rd layer (about 1/3 of the planter volume, so about 10 cm / 4 inches): nutrient-rich layer of semi-mature compost, worm castings, animal manure (horse, cow, chicken, guinea pigs) and bedding
- 4th
layer (about 1/3 of the planter volume, so about 10 cm / 4
inches): dense layer of high-quality garden soil or potting soil, mixed with
some mature compost (press down lightly after spreading, and replace
annually after each harvest!)
 1st layer: branches, twigs, and rootstocks
 2nd layer: twigs, leaves, and grass clippings
 3rd layer: guinea pig bedding with old hay and piggy manure
 3rd layer: semi-mature compost from our garden compost, mixed with store-bought mature compost
 4th layer: good-quality potting soil, mixed with some more store-bought mature compost
If you are just starting out, I suggest beginner-friendly plants like strawberries, squash, Swiss chard, lettuce, or radishes.
Look into companion planting, as some plants get along better with some than with others, and some can even cause issues when paired! For example, onion pairs very well with Swiss chard, and strawberries are good neighbours for beans – whereas potatoes and tomatoes are "foes", as are carrots and dill, which is why they should not be planted next to each other.
I highly recommend also including beneficial herbs and flowers that will a) attract and feed pollinators such as bees and butterflies, and b) help deter certain pests. Plus, it just looks very pretty to have a few bright blooms in the planter as well! You can't go wrong with calendula (especially great for tomatoes), basil (especially great for tomatoes, peppers, and oregano), thyme (especially great for cabbage), nasturtium (especially great for squash, cabbage, cucumber, and tomatoes), and cosmos.
To make things easier, you may also consider installing drip tape irrigation to save water – and mainly save you a lot of time. Because let me tell you, watering all those plants every day in summer takes time!
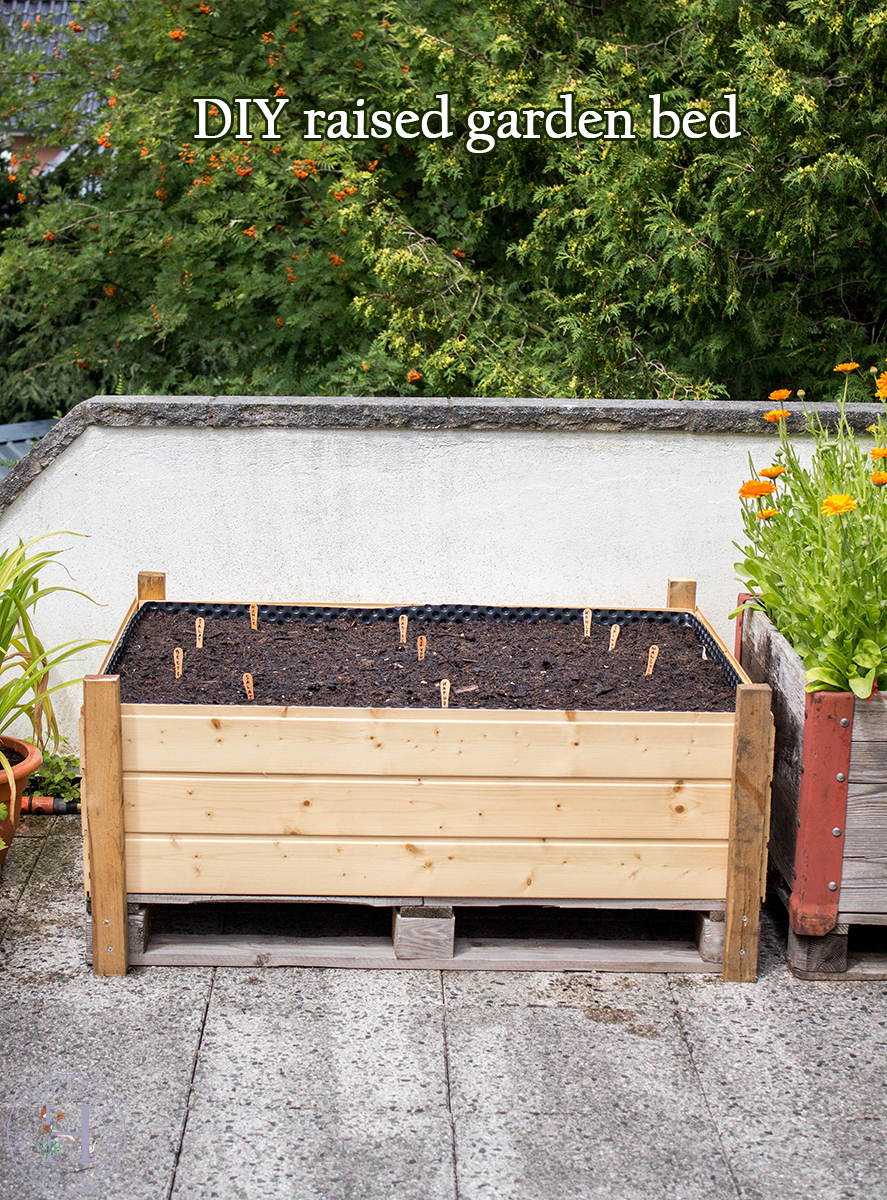
 The finished raised garden bed with direct-seeded radishes, spinach, Swiss chard, lettuce, beetroot, and nasturtium. I also marked where our red cabbage and kohlrabi plants are going to be transplanted next month (centre and top).
Of course, the actual cost of a self-made raised garden bed depends on many factors, such as the type of wood you choose, what you use to line the bottom and sides, whether you add wood sealer, and which soil you purchase.
For example, at our local hardware store you can get:
- 6 Douglas fir boards (200 x 14.5 cm / 78.8 inches x 5.7 inches) for 45 € which is enough to make the entire frame
- 1 piece of fir wood slat (200 x 4.8 x 2.4 cm / 78.8 x 2 x 1 inches) which is enough for the four corner posts for just 1.70 €
- 2 square meters garden fleece for 3.98 € (you'll only need part of it)
- 4 square meters pool liner for 6.38 € (you'll only need part of it)
- a packet of 100 2.5-cm screws for 5.95 € (you'll only need half of it)
- a packet of 20 7-cm screws for 4.95 € (you'll only need half)
Total: 67.96 €
For reference, at the same hardware store a ready-made raised garden bed of similar size costs about 100-150 €. That means, if I'm doing the maths correctly, you are saving about 32-72 € with this do-it-yourself raised bed! And you have the liberty to design everything exactly the way you want it (or use leftovers and spend next to nothing on this!).
You'll notice that the wooden pallet isn't listed above. That is because it's a) optional, and b) you can usually get one-way wooden pallets for free from companies that have a warehouse (for example, the publishing house I used to work for, had plenty of them, as does my neighbour who owns a construction company). So it's definitely worth asking around instead of purchasing one!
In my case, we actually only spent as little as 3.98 € on our DIY raised bed! Why? Because we made do with what we already had at home: the old wooden pallet was gifted to us from said neighbour years ago, the posts were lying around in our garden, and the boards were left for us from the former house owners (they are actually spruce panels with tongue and groove and a transparent varnish – we were thrilled to finally have found a use for them!). We also got leftover dimpled sheet from my mum’s community garden for free, and the screws were also "leftovers" from other projects. So all we actually paid for was 23.18 € for 40 litres of organic raised bed compost (half of it for the 3rd layer, the other half for the 4th layer) and 80 litres organic raised bed potting soil (you will need about 100 litres of humus soil for the 4th layer), and 3.98 € for the garden fleece! That's zero waste for you! 😉
Since we used a bunch of old wood, it might not last as long as using high-quality cedar or redwood that has been sealed – perhaps only 5 or 7 years instead of 10 or up to 20 years – but honestly, that’s still worth it to me! (After all, our other DIY raised bed has been going strong for 3 years now, also using an old untreated wooden frame of some sort and an old untreated wooden pallet that were both gifted to us, and there’s no sign of it falling apart any time soon!)
All in all I can only urge you to always use what you have instead of buying new stuff! I mean, you don't even need a fancy pool liner or dimpled sheet – just use some old covering sheet if you have some lying around. Or, if you don't have any material lying around, you can get things like scrap wood off of craigslist or the like for free or very cheap.

 August update. What the raised bed looks like almost 1 month later: radishes (centre), nasturtium (front), beets and lettuce (left), swiss chard and green onions (right) are thriving! The red cabbage has been transplanted and is hiding amidst the radishes that we are going to harvest this week. The two large brassicas in the back are Brussels sprouts (left) and savoy cabbage (right back). The kohlrabi is already waiting to be transplanted in the left back. Success!
The only thing that didn't make it is the spinach, unfortunately. But I might direct-sow another round once the radishes are gone ...


Maisy


0 Comments