Homestead Herbs & Healing | holistic living
  • Start Here
  • Homestead
  • Herbs
  • Healing
  • Recipes
    • Breakfast
    • Main Course
    • Dessert
    • Snack
  • DIY
  • Minimalism
  • About Me

 reading time: 8 min


Have you ever heard of Meadowsweet? Or walked through a meadow and noticed a distinct lovely sweet smell, like almonds and honey? Then chances are that you have passed meadowsweet blooming. It also goes by the names of Mead Wort, Queen of the Meadow, Lady of the Meadow, and Bridewort among other names. I like to think of it as the wild little sister of elderflowers, and you can use it just like elderflowers to make syrup/cordial, tea infusions, jelly, mead, champagne, or to infuse into vinegars.
 
After sharing a recipe for homemade elderflower cordial last summer, this year I'm trying out a variation with meadowsweet. So if you missed the elderflower season this year, don't be sad – because the little-known meadowsweet is still in full bloom! It can be made into cordial in exactly the same way that elderflowers would be, and it has a similarly sweet, though definitely heavier, more almond-y flavour, kind of like amaretto cookies. As a lifelong fan of elderflower cordial, it feels like a betrayal to say this, but I think I almost like the meadowsweet version better!

This delicate meadowsweet cordial is also great for flavouring ice creams, cakes, panna cotta, yogurt, kombucha, white wine, champagne or prosecco.


The Health Benefits of Meadowsweet

Meadowsweet is a perennial herb that is mostly known for containing salicylic acid, which is the natural version of the synthetically altered version of salicin that aspirin is made from (the word "aspirin" is even derived from Latin "spirin", based on meadowsweet’s former botanical genus name, "Spiraea"). The medicinal plant also contains vitamin C, iron, calcium, magnesium and silica, all of which are necessary for a good strong healthy bone system, hair and nails.
 
Used internally, meadowsweet is an excellent natural remedy to treat problems with joints and muscles such as rheumatic disorders, particularly inflammatory conditions like arthritis and gout due to its anti-inflammatory properties, as well as being a mild painkiller. Its diuretic effect has proven effective in bladder and gallstone problems as well as fluid retention in the tissues.

Meadowsweet can also be used in a blood purifying cure, as well as a diaphoretic remedy for feverish colds. It's particularly useful
in conditions like acid stomach, heartburn, gastritis, peptic ulcers, colic, flatulence etc. All parts of the plant have an astringent effect and are a mild remedy for diarrhoea.
 
Used externally in ointments and poultices, it can help to relieve pain and improve wound healing.
 
Historically, meadowsweet has been used to flavour mead (hence the name "mead wort"), as well as being used as a strewing herb in Elizabethan times, strewn on floors (for example during weddings in churches, hence the name "bridewort") to give the rooms a pleasant aroma. Dried, the flowers are also used in potpourri.

It's also interesting to know that meadowsweet, water mint, and vervain were three herbs held most sacred by the Druids. Also, anything made with meadowsweet is ideal for using at the harvest festival Lughnasadh, also called Lammas, that is coming up on the 1st of August since this is one of the corresponding plants.


Where and How to Harvest Meadowsweet

Meadowsweet (Filipendula ulmaria) prefers moist habitats and sunlit areas, and therefore is often found near water or damp meadows, alongside drainage ditches, roadsides, hedgerows, streams and lakes. They can reach up to 2 meters in growth. And believe me, even though they are not very prominent flowers, once you start noticing them you’ll see them everywhere!

Before going out to forage for any wild meadowsweet, do your research to make sure you have the right flower. Plants that resemble the meadowsweet plant include its close relative and non-toxic dropwort (Filipendula vulgaris) as well as the edible and equally delicious elderflowers, but it can also be mistaken for the deadly poisonous hemlock or the toxic fool's parsley. There are four ways to identify meadowsweet (and as with all wild herbs, make sure your plant matches ALL of the identifiers! only pick when you are 100 % sure this is the right one!):

1) the environment, as described above.
2) the leaves which are easy to identify because of their very distinctive pattern, with serrated, crinkled leaves coming out in pairs and tiny little leaflets in-between the larger leaves along the stalk, and a three-pronged leaf at the end, similar to a Canadian maple. The leaf stalks come out alternately from the evenly pinkish red stem. if you are still not sure, take a leave and crumple it between your fingers. It should have a characteristic medicinal smell similar to Germolene antiseptic cream due to the concentrated salicylic acid.
3) the shape of the fragrant flowers, which grow in irregular shaped clusters of frothy flowers known as cymes. Each tiny flower has 5 petals. When fully in bloom, they look fuzzy, candyfloss-like and of a similar creamy-white colour to that of the elder. Their fruits have a twisted, spiral-like appearance.
4) the scent of the flowers, which is a very sweet and intense mixture of honey and almond. It resembles the aroma of elderflowers a bit, but with a distinct hint of marzipan.


Meadowsweet flowers bloom from June to August, so make sure to collect the flowers when they are in full bloom for their intense aroma. As the flower blooms in "stages" and there are several inflorescences on one stem, the harvest time is quite long.


When picking meadowsweet, you want to remember that the flowers that are open are the ones that have the most smell and flavour, so avoid ones that have got the buds still closed up. Aside from not giving off any flavour, when you pick closed buds those will not be able to blossom later on – which means you'd be wasting a great source of nectar and food for wildlife, particularly bees!

I always do my best to find as many plants as possible so that I can take a little from each instead of taking everything from only a few plants. That way I leave plenty for the animals, especially the pollinators. About a "bridal bouquet" of meadowsweet (see picture at the bottom of this blog post) is enough to make a little over 2 litres of delicious cordial anyway!

It's best to harvest meadowsweet later in the morning on a dry sunny day. Don't pick them right after a rain shower as they will lose some of their aroma. Clip your meadowsweet flowers with scissors, and put them in a basket or a paper bag to allow them to breathe (and for bugs to escape).

General Foraging Guidelines:
  • You should be 100 % certain you are identifying the correct plant. If you do not know what it is, DO NOT eat it! Do not pick if you're in doubt!

  • Don't harvest from contaminated areas such as busy roadsides, near industrial facilities, where dogs pee, along the edges of agricultural fields, old landfill sites etc.

  • Be mindful & harvest sustainably. Only pick from areas that have a plentiful supply, and never more than 1/4 of a plant, ideally only about 5 %.

  • Leave the harvesting area litter-free.


All parts of the plant are edible, and can be added to soups, sauces or stewed fruit for an aromatic flavour. The bitter roots can be used in tea infusions, as can the sweet flowers, and the leaves.

As the English botanist John Gerard once said: Meadowsweet »makes the heart merrie and joyful and delighteth the senses«!

 reading time: 2 min


I don't know how common this sort of cake is in other countries, but here in Germany a so-called Maulwurfskuchen aka "mole cake" is very popular for birthday parties, especially for children, lol. It's basically a banana and cream filled chocolate cake with LOADS of whipped cream that is supposed to look like a mole hill like the ones you'll find in the backyard, a little mound in the earth with dirt scattered around – or chocolate cake crumbs, in this case!

This one in particular was kindly made by my fiancé J for my granny's 79th birthday a few weeks ago because I had a very bad case of back pain and could hardly walk or move that day. Thanks babe! :-* (I also forgot to bring my camera so for now you'll need to put up with the few photos I took with J's phone.)

The great thing about this mole cake recipe is that is doesn't only look cute, but is very easy to make! You only need to bake a soft chocolate cake, whip up some cream, and slice a bunch of bananas, and you're basically done. It's best to prepare the cake either the night before or the morning of because it does need to chill in the fridge for 2 hours.

I hope you'll give this a try – 'cause it's really good :)


VEGAN MOLE CAKE

Preparation time: 1 h 30 min (+ 2 hours chilling time)
Main ingredients: spelt flour, bananas, whipping cream, cocoa powder
difficulty level: easy-moderate
serves: 12 (26 cm- or 10-inch springform pan)
suitable for: vegan, lactose-free, wheat-free, yeast-free, soy-free

Ingredients

For the cake batter:
500 g spelt flour, sieved
200 g sugar (we used raw cane sugar)
1 pack baking soda, sieved
1 pack vanilla sugar
50 g cocoa powder
pinch of salt
1 large ripe banana, mashed
350 ml sparkling water
200 ml plant-based milk
150 ml canola or sunflower oil

For the filling:
500 ml vegan whipping cream
2 packs (16 g) whipped cream stabilizer
1 pack vanilla sugar, or to taste
80-100 g vegan dark chocolate shavings or finely chopped dark chocolate
2-3 bananas, cut in half lengthwise (see notes below)

Instructions

For the batter:

In a large mixing bowl combine sieved spelt flour, sugar, vanilla sugar, baking powder, cocoa powder, and salt. Whisk together.
Add mashed banana and plant-based milk. Stir well. Fold in oil and sparkling water, and mix again. Leave for 15 minutes, meanwhile preheat the
oven to 180 °C / 350 °F.
Transfer the dough into a greased springform pan (Ø 26 cm or 10 inches). Bake at 180° C convection oven for about 40 minutes, or until a skewer comes out clean. Allow to cool completely.

For the filling:

Whip the (vegan) cream with cream stabilizer with an electric hand mixer. Add vanilla sugar and continue beating until stiff. Gently fold in chocolate shavings using a spatula, and set aside in the fridge until ready to use.

To assemble:

Once the cake has cooled, cut off the top horizontally (leave more to the bottom part). Put in a bowl and cumble – this is supposed to later resemble the soil on top of the mole hill.
Slightly hollow out the cake base in the middle using a spoon (be careful not to go all the way down and pierce through the bottom), leaving a rim. Line the scooped out center with halved bananas.

Spread whipped cream from the fridge onto the banana layers, creating a round mount in the center to shape the mole hill. Lastly, spread the "hill" with the crumbs from the top of the cake. (Of course, you could also go the extra mile and actually make a mole out of marzipan or fondant to place on top of the hill like The Spruce Eats did!)

Place the light-shy mole cake into the fridge for at least 2 hours or until it is ready to serve. Enjoy!


NOTES & TIPS:

- To make this cake even more chocolaty, feel free to add 3 tsp of cocoa powder to the cream filling.
- For a fruitier version of this cake, add about 2/3 cups of stewed cherries or berries on top of the banana layer.
- Or replace the banana altogether, swapping it for fruits like strawberries, raspberries, blueberries, cherries, rhubarb, peaches or even tangerines.
- Another option would be to spread a layer of vanilla custard on top of the halved bananas for an even sweeter, vanilla-y cake.
- If you find that you have too much of the cake crumbs left over, eat them with yogurt (or just spoon them with some whipped cream and strawberries, yum!)
- If your springform pan is smaller than mine, I recommend cutting the cake batter ingredients by half (except for the banana) because it's quite a lot of batter. So: 250 g flour, 100 g sugar, 1/2 pack baking soda,1/2 pack vanilla sugar, 25 to 30 g cocoa powder, pinch of salt, 1 banana, 175 ml sparkling water, 100 ml plant-based milk, 75 ml canola or sunflower oil. Don't forget to reduce the baking time as well! 20 to 30 minutes should be enough.


♥

Maisy


reading time: 3 min


In my blog post on Healing Clay Skin Mask & Detox Drink I already talked about the detoxifying and re-mineralizing properties of clay. But what if I told you that you can also use the cleansing power of mineral clay to wash your hair?

Washing your hair with dirt is definitely the most hippie advice I've given on this blog, but I honestly swear by it now! It's easy, efficient, and as natural as it can be.


What is Rhassoul / Ghassoul clay?

Rhassoul / Ghassoul clay is a mineral-rich Moroccan volcanic clay that has been used since ancient times for washing and cleansing the body. It is very skin-friendly and non-irritant. It does not attack the acid mantle of the hair or the sebaceous glands of the skin. It is mostly comprised of silica (52 %) which is known to stimulate hair growth, and magnesium (25 %) which strengthens hair follicles and hair, as well as iron, which prevents hair thinning and hair loss. It is said to help with acne, eczema, psoriasis, dandruff, boldness, and other skin issues, and reduces dryness and flakiness of the scalp. Unlike medicinal healing clay, you should never consume Rhassoul clay internally!

Rhassoul clay is full of negatively-charged molecules, which allow it to act as a magnet for positively-charged toxins on the scalp. These clay molecules attach to the dirt molecules, grease and other impurities on the scalp so that when your hair is rinsed, the scalp is essentially detoxed. The name "rhassoul” comes from the Arabic word rassala, which means “to wash”.

Using Rhassoul clay in a homemade clay wash is a very gentle to cleanse your hair and scalp. The clay removes build-up and dirt without removing the protective sebum layer on your hair, and also acts as a great detangler.

Rhassoul clay is 100 % environmentally friendly. It contains no tensides and no chemical substances that can pollute the water. The only disadvantage is that the clay is transported from North Africa to – in my case – Germany.


reading time: 4 min


This homemade wild herb & garlic butter is bursting with tons of fresh herbs and "weeds" (!), and crushed garlic. It's the perfect quick and easy-to-make homemade condiment to eat with toasted bread, baked or mashed potatoes, grilled vegetables, or even with pasta.

The beautiful thing about making homemade herb butter is that any blend of fresh herbs can be used! If you don't care for parsley, dill, or dandelion, feel free to swap them out for something you enjoy.

In terms of foraging, late spring / early summer is my favourite time of the year! Wild herbs and so-called "weeds" are shooting up everywhere, trees are budding, and birds are chirping their beautiful songs. It's pure joy to go on an extended walk, maybe to a nearby forest or a secluded meadow to pick some edible spring-blooming flowers, herbs, and greens.

And of course, is there anything better and more rewarding than getting your hands dirty and planting your own (balcony / windowsill) garden in return for an abundance of fresh fruits, herbs and vegetables?

My favourite wild herbs and "weeds" to forage for during spring & summer are
- stinging nettles
- dandelions
- daisies
- garlic mustard
- goutweed aka ground elder
- garden sorrel 
- plantain
...

If you are wondering why I use "weeds" in my herbed butter, that's because wild herbs (and any wild plants) which are usually
considered unpleasant "weeds" – like nettle or chickweed – are actually more nutrient-dense and potent than their counterparts! Wildcrafted herbs are also naturally organic and often more chemically diverse. Stinging nettle for example can be used in recipes as a substitute for spinach, but has a wider variety of nutrients, including vitamins A, C and K, as well as several B vitamins, high levels of calcium (822 mg / 1 oz), zinc (0.13 mg), magnesium (243 mg), potassium (496 mg), iron, phosphorus, various fatty acids and polyphenols, and all of the essential amino acids (aka protein)! It's a true superfood. Plus, it's just the most satisfying feeling to go out and harvest your own – free! – food from nature's abundance. It's also a way of re-connecting with Mama Earth :)

General Foraging Guidelines:

  • You should be 100 % certain you are identifying the correct plant. If you do not know what it is, DO NOT eat it! Do not pick if you're in doubt!

  • Don't harvest from contaminated areas such as busy roadsides, near industrial facilities, where dogs pee, along the edges of agricultural fields, old landfill sites etc.

  • Be mindful & harvest sustainably. Only pick from areas that have a plentiful supply, and never more than 1/4 of a plant, ideally only about 5 %.

  • Leave the harvesting area litter-free.


As for "cultivated" herbs, unfortunately I currently only grow a couple of them on my balcony and in-doors: parsley, dill, cilantro, mint and sage. Our rosemary keeps dying on us, so for now we'll only stick to those, but I'm really hoping that we'll be able to grow more herbs such as rosemary, chives, oregano, and basil in our future backyard.

reading time: 3 min


Y'all probably know by know that I  l o v e  the combination of coconut (milk) and mango. It's just the best! If a tropical island was a food, it would be coconut and mangoes 😃

So basically, these popsicles are the frozen version of my beloved sticky rice with mango, or the more toned down coconut rice pudding with mango.

Honestly, flavour-wise I even prefer them to the chocolate coconut fudgesicles I shared last weekend – and I mean, it's chocolate!! 😱 So let's not waste any more time, and let's get started with this healthy homemade popsicle recipe!

reading time: 2 min


We're currently going through our first 35 °C heatwave here in Germany (that's 95 °F if you're wondering), and I'm VERY prone to eating at least one popsicle, if not two during those hot afternoons. To keep my sugar intake at a more healthy level, I try to reach for sugar-free alternatives where ever possible which is why I like to make my own popsicles – or in this case "fudgesicles".

In this case it's up to you: You can either keep these fudgesicles sugar-free (they are very creamy and delicious on their own – J and I had already eaten two plain ones before I took the pictures, hehe), or you can add a bit of sugar by drizzling them with some dark chocolate. Either way, it's way more healthy than those – admittedly yummy – (vegan) store-bought popsicles with about 20–25 g refined sugar per serving. Our popsicles have 0 g refined sugar when omitting the chocolate drizzle, and about 2,5–3 g refined sugar per serving with the chocolate drizzle. So about one-tenth ...

(Also, ignore my ugly non-matching
plastic popsicle sticks, lol. I'm already looking into replacing them with sustainable molds. Those are REALLY pricey though. 40 bucks for 10 stainless steel popsicle molds!!)

 reading time: 3 min


Hello my fellow freckly-banana-lovers!

Honestly, there's nothing better than a bunch of spotty, overly ripe "leopard" bananas. You can freeze them to make smoothies or a variety of nicecreams, or you can mash them easily to make delicious, naturally sweet banana bread or even waffles. The riper the better!

I already have three different banana bread recipes here on my blog, all from ages ago, but I never really strayed from the path of combining bananas with some type of flour, oil and plant milk. So today I want to share something a little more exciting with you, and that's peanut butter chocolate banana bread. With a pretty swirl and a soft crunch from roasted peanuts and a bit of melted sweetness from the chocolate chips.

Only recently have I been made aware that banana bread (along with Dalgona coffee, cloud bread, pancake cereal, and sourdough bread) has become something like a pandemic food trend over the past year or so. Which is weird to me because I made a bunch of banana breads BEFORE the pandemic and NONE at all during the pandemic (until now), but as I mentioned in my blog post on What the Corona Crisis Teaches Us, I think it's great that people start to make their own bread again, or in this case, banana bread. (By the way, this was our sweet sustenance for a lovely canoe trip last weekend!)

So let's get started!

 reading time: 8 min


So, first off: What exactly is kombucha? I've recently published a looong blog post all about the health benefits, general tips and troubleshooting instructions for making and utilizing kombucha, so make sure to check that out first!

But in a nutshell, kombucha is a refreshing and delicious fizzy fermented tea with numerous health benefits that is served cold. It is made through a double-fermentation process (don't let that intimidate you!) with the aid of a SCOBY, a Symbiotic Culture Of Bacteria and Yeast.

The good news is, once you've got the hang of it, kombucha is extremely easy to make at home and only costs a fraction of the price compared to store-bought kombucha! It kind of makes you feel like a little (al)chemist or a kitchen witch with all that brewing and fermenting :)

The method I use for making my own kombucha is batch brewing, meaning I always make one batch at a time versus continuous brewing. This method is straight-forward and perfect for beginners! (And for people who don't want to make kombucha all the time for the rest of their life, lol.)


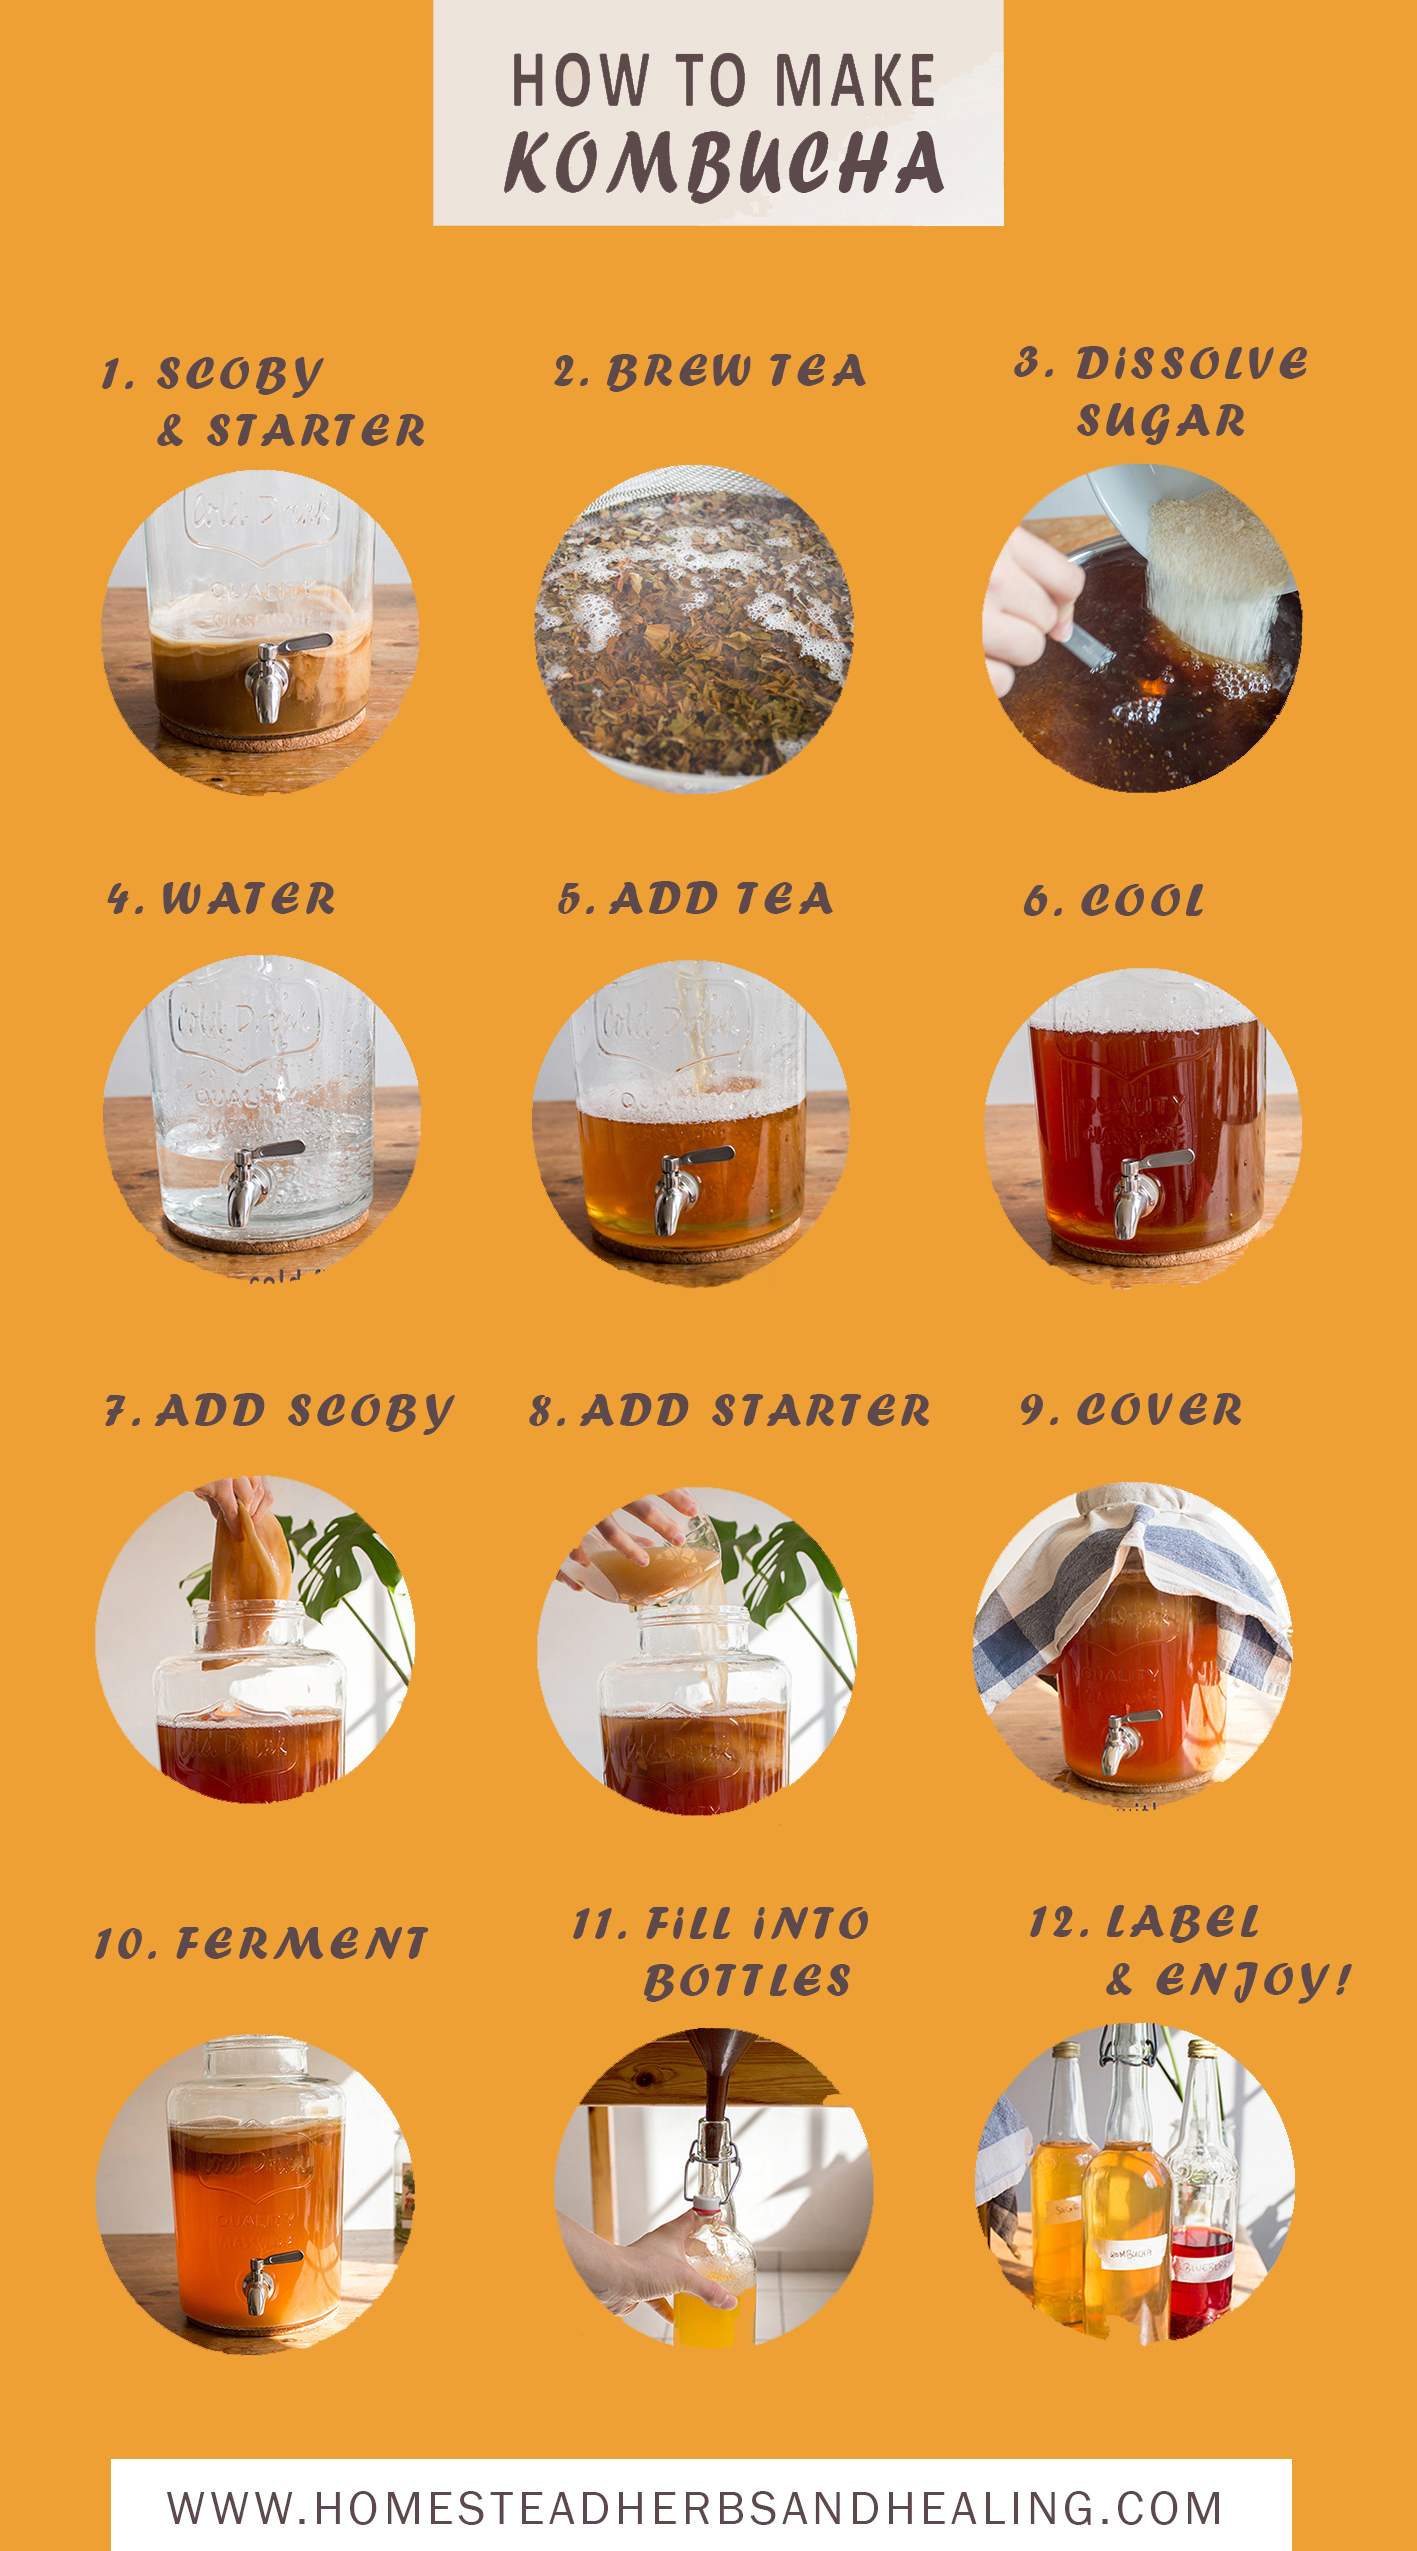
Scroll down for my recipe + step-by-step guide with pictures to learn how to prepare your own kombucha (batch brewing) at home!

What You Will Need: 

for making kombucha / 1st fermentation:

- a SCOBY
(Symbiotic Culture Of Bacteria and Yeast; homemade from previous batch of kombucha, given by friend, or purchased online from a reliable source)
- starter liquid (either
unpasteurized, unflavoured store-bought kombucha or leftovers from a previous batch)
- tea (black tea is best for starters, but green tea, rooibos tea and even fruity teas work as well with a larger SCOBY; only use tea without aromatic oils, so no Earl Grey etc.!)
- granulated sugar (e.g. white sugar, brown sugar, cane sugar)
- filtered tap water
- 
a wide mouth glass or ceramic container (should hold between 1 liter and 1 gallon/3.7 liters; preferably with a spigot, either made of plastic or stainless steel!)
- a tightly woven cloth (e. g. gauze, coffee filter, napkin or a dish towel;
apparently cheese cloth is not effective at keeping fruit flies out!)
- a rubber band
- a large pot for brewing tea
- about 1 hour of time every week or two


for bottling + 2nd fermentation:

- a sieve
- a funnel
- several airtight bottles, ideally with flip flop lids *
- (optional) fruits, herbs and/or spices of your choice


* I re-used a bunch of old bottles from store-bought cider and other fruit wines which I sterilized with boiling water, some natural dish soap and vinegar; another way to sterilize your bottles is to put them in an oven on low heat of 110 °C / 230 °F for around ten minutes – if it is too hot, they'll crack!


The Recipe:

HOMEMADE KOMBUCHA


Preparation time: 70 mins + 7 days fermenting
Main ingredients: SCOBY, black or green tea, sugar
difficulty level: easy-moderate
makes: 4.5 litres kombucha
suitable for: vegan, lactose-free, gluten-free, nut-free, soy-free, low-fat

Ingredients

general guidelines:
1 SCOBY

10 to 20 % (of the total amount of water using) starter liquid
8 g organic tea per liter (of water using), either loose or tea bags
50 to 100 g granulated sugar per liter (of water using)
filtered water

my specific recipe:
1 SCOBY (mine is about 600 g by now)
800 ml (
~ 3 1/2 cups) starter liquid (from the previous brew)
40 g (~ 8 tbsp or 16 bags) organic loose black or green tea (in my case it's a Darjeeling first flush)
300 g (~ 1 1/2 cups) cane sugar
3 liters (12 cups) of boiling filtered water
2 liters (8 cups) of cold filtered water

This recipe makes about 4.25 liters (~ 1 gallon) of kombucha!  Scale up or down to make as much as you need.


Instructions

Part 1: First Fermentation

Gather your supplies: a large glass container (the size depends on how much you want to make – in my case it's a 1.5 gallon container with a stainless steel spigot, but I usually fill it with only 1.3 gallons of tea), a SCOBY, starter liquid, sugar, and tea. Make sure your supplies are clean (just use hot water and a splash of white vinegar to "sterilize" them).

If your SCOBY and mature liquid / starter tea are still in their fermentation container from the previous batch, gently take it out with very clean hands, and transfer to an equally clean glass or bowl, along with the liquid. Cover with a clean plate or cloth.

Prepare the sweet tea. Bring filtered water to a boil. Steep organic loose tea or tea bags in hot water for 10-12 minutes.

Strain tea. Discard OR – much better – place the tea leaves on a baking tray to dry and save for the next round of making kombucha (I just blend them with "fresh" tea, or just steep the tea a little longer). Alternatively, black tea leaves make for a great natural fertilizer, so just mix it into the soil in your backyard or give it to your indoor plants!

In the meantime, clean your glass container if it isn't already clean. I use hot water and white vinegar (mature kombucha works as well) to "sterilize" mine. If yours has a spigot like mine, be very careful not to break it!

Fully dissolve sugar in hot tea. I use a stainless steel spoon for this.

Assemble the brew. Transfer cold filtered tap water in the glass container. Then transfer sweet tea mixture into the glass container, on top of the cold water.

Set aside to cool until the mixture to about room temperature. During that time, cover the container with a clean kitchen towel to prevent anything from contaminating your tea mixture.
Don't be impatient here – hot water will kill your SCOBY! Like all yeasts, it must not be heated above 30 ° C, otherwise it will die.

Once the tea mixture has cooled down, gently slide your SCOBY into the glass container with very clean hands. (I usually remove a few layers every other batch of so as to not let the SCOBY get too thick.) The SCOBY will eventually float to the top of the jar – don't worry if it doesn't.

Also add your starter liquid to the glass container.

Ferment. Hooray, the hard part is over! Your brew is now ready to ferment! :)

Cover the "mouth" of the glass container with a tightly woven clean cloth or kitchen towel and secure with a rubber band. The kombucha needs to breathe, but we don't want any contamination like dust, mold spores, or fruit flies inside.

Set the container somewhere warm (ideal room temperature: 70-75 °F / 21-24 °C), dark and undisturbed for 7 to 14 days. A brand new kombucha might even take up to 21 days to ferment. Ambient room light is fine, but avoid direct sun rays.

The warmer the room temperature, the faster the kombucha will ferment. The longer the tea ferments, the more sugar will be eaten up by the SCOBY (this lil' sugar monster!), and the less sweet the kombucha will be.

It's best to begin tasting at about day 6 – this is where a spigot comes in handy. Otherwise, use a stainless steel spoon or a ladle to taste your kombucha (obviously, clean it before dipping it in again!). The taste you're looking for is a slightly sweet, slightly fruity, slightly tart with a mild vinegary hint, but far less than in apple cider vinegar for example. You'll definitely notice a "sweet spot" during the process.

TIP: Write down the date you started the fermentation process because you will forget!

Part 2
: Bottling / Second Fermentation
 
Once your kombucha has fermented to your ideal tartness, it is time to get it bottled!

BTW: You will probably notice that a thin layer has formed on top of the original SCOBY. Don't freak out – that is a new baby SCOBY that can either stay where it is (that way your SCOBY will get bigger and more potent), or you can use it to make a different batch of kombucha in a separate container, for example with green tea. Or give it to a friend to start their own kombucha brewing station!

Bottle your kombucha. Fill the finished beverage into clean, sterilized bottles using a funnel. For plain, unflavoured kombucha
I usually also use a fine mesh sieve to filter out any stringy bits of yeast – don't strain them yet when continuing with second fermentation, as those will help with carbonation and fizz. Leave about a half inch or 1.5 cm of head room in each bottle. (If you want to add any flavours, leave about 1.5 inches or 4 cm at the top!)

Make sure to reserve about 10 % or at least 2 cups of your mature kombucha from this batch to use as a starter liquid for your next for your next round.

Store bottled kombucha in the fridge to prevent any further fermentation and carbonation. (Or, go to the optional 2nd Fermentation, first!)

Begin the brewing cycle again to make your next batch of homemade kombucha, starting at Step 1.

Optional: Add flavour to your "booch"! This is one of the most fun parts of making your own kombucha – coming up with various flavour combinations! This "second
(and final) fermentation" is where you add fruits, herbs and/or spices to your "first fermentation", aka your freshly bottled kombucha. Just throw in a handful of your favourite fruit, chopped and slightly crushed, to let out the juices.

I will do a separate blog post on delicious flavours soon, but some of my current favourites include ginger, lemon & ginger, strawberries, lavender, and sage.

This is a great way to utilize overripe or damaged fruit instead of composting it!

Store kombucha in a dark place at room temperature for 3 to 7 days for 2nd fermentation – you can tell it's ready when there is a noticeable
hissing/fizzing noise when quickly lifting the lid! (don't open the bottle all the way or for very long, or you'll lose a lot of that carbonation) To prevent your bottles from exploding from the pressure of carbonation, definitely "blurp" your bottles by opening them to release some pressure.

Once the 2nd fermentation is done, strain out any fruit or herbs (to prevent moulding). Place strained flavoured kombucha in the fridge to stop any further fermentation.

Drink chilled or at room temperature.


Step-by-Step Guide with Pictures


1st FERMENTATION:


Step 1.
Gather your equipment: a large glass container (in my case a 2 gallon container with a stainless steel spigot), a SCOBY, starter liquid, sugar, and tea.

If your SCOBY and (starter) liquid is still in its fermentation container from the previous brew, gently take it out with very clean hands, and transfer to an equally clean bowl. Cover with a clean plate or cloth.


Step 2.
Bring filtered water to a boil. Steep loose tea or tea bags in hot water for 10 minutes.


Step 3.
After 10 minutes of steeping, s
train tea. Discard tea leaves OR - way better - place on a baking tray to dry and save for the next round of kombucha making. Alternatively, dried black tea leaves make for a great natural fertilizer, so just mix it into the soil in your backyard or give it to your indoor plants!

In the meantime, clean and sterilize your glass container if it isn't already clean. I use boiling water and white vinegar (or even kombucha) to sterilize mine. If yours has a spigot like mine, be very careful not to break it!


Step 4.
Dissolve sugar in hot tea. I use a stainless steel spoon for this.


Step 5.
Transfer filtered water into the glass container.


Step 6.

Transfer tea sugar mixture into the glass container, on top of the cold filtered water.


Step 7.

Set aside to cool until the mixture to about room temperature. Cover with a clean kitchen towel to prevent anything from contaminating your tea mixture!

Don't be impatient here – hot water will kill your SCOBY!


Step 8.
Once the tea mixture has cooled down, transfer your SCOBY to the glass container with very clean hands.


Step 9.
Add your starter liquid to the glass container.


Step 10.
Hooray, the hard part is over! Your brew is now ready to ferment! :)

Cover the glass container with a clean cloth and secure with a rubber band. Set the container somewhere warm (ideal room temperature: 70-75 °F / 21-24 °C) and not in direct sunlight for 5 to 14 days, a new kombucha might even take up to 21 days to ferment. The warmer the room temperature, the faster the kombucha will ferment. The longer the tea ferments, the more sugar will be eaten up by the SCOBY, and the less sweet the kombucha will be.

It's best to begin tasting at about day 6 – this is where a spigot comes in handy. The taste you're looking for is slightly sweet, slightly fruity, slightly tart with a mild vinegary hint, but far less than in apple cider vinegar for example. Maybe more like a fizzy ginger-ale.

TIP: Write down the date you started the fermentation process because you will forget! That way it's easy to track the fermentation.


BOTTLING / 2nd FERMENTATION:


After 7 to 21 days your kombucha should be ready!

You will probably notice that a thin layer
has formed on top of the original SCOBY – that is a new baby SCOBY that can either stay where it is (that way your SCOBY will get bigger and more potent), or you can use it to make a different batch of kombucha in a separate container, for example with green tea. Or give it to friends to start their own kombucha brewing station!


Step 11.
Fill kombucha into clean bottles using a funnel. (If you want to add any flavours, make sure to leave about 1 1/2 inches or 4 cm at the top!) Make sure to reserve about 10 % or at least 2 cups of mature kombucha from this batch to use as a starter tea for your next for your next round!

Store bottled kombucha in the fridge to prevent any further fermentation and carbonation. (Or, go to Step 12: 2nd Fermentation, first!)


Using your leftover kombucha as starter liquid, begin the brewing cycle again to make your next batch of homemade kombucha, starting at Step 1.

And then the whole process starts over. And over … (so yeah, maybe we do become slaves / addicted to making kombucha all the time for the rest of our lives after all, lol!)


Optional Step 12:
This "second fermentation" is where you add fruits, herbs and/or spices to your "first fermentation", aka your freshly bottled kombucha. Try things like ginger, lemon & ginger, strawberries, peaches, or even lavender and sage.

This is a great way to utilize overripe or damaged fruit instead of composting it!

Store kombucha in a dark place at room temperature for 3 to 7 days
for 2nd fermentation – you can tell it's ready when there is a noticeable hissing/fizzing noise when quickly lifting the lid! (don't open the bottle all the way or for very long, or you'll lose a lot of that lovely carbonation)
 
Strain out fruit after 3 to 7 days of fermenting (to prevent moulding). Place strained flavoured kombucha in the fridge to stop any further fermentation. Drink chilled or at room temperature.


One day later ... As you can see, most of the fruit pieces have sunk to the bottom of the bottles, the berries have stained the tea a pretty pink-red and purple, and the plain kombucha has been tapped already ;)


I hope this blog post inspires you to dabble in booch-brewing yourself. Once you've got the hang of it, it's really not that difficult, and not very time-consuming either.

Happy brewing!


♥

Maisy


Newer Posts Older Posts Home

THIS IS ME

Well, hello! My name is Maisy (pronounce: macy) and I’m the creative spirit behind this blog. You are welcome to join me on my journey to a more natural, slow-paced & healthier life!

SUBSCRIBE & FOLLOW

TRENDING THIS MONTH

  • 12 Easy Hairstyles For Shoulder Length Hair | Long Bob
  • Homemade Natural Sunscreen
  • The Inspiration Myth | 8 Ways to Get Creative Instantly
  • DIY Hair Growth Oil
  • DIY Easy Electroculture Plant Antenna

Categories

  • Ayurveda 17
  • beauty 39
  • breakfast 60
  • dessert 180
  • diy 53
  • fermenting 9
  • fictional food 21
  • foraging 30
  • gardening 11
  • gluten-free 98
  • healing 72
  • herbs 28
  • homestead 122
  • main course 30
  • minimalism 39
  • snack 92
  • sugar-free 91
  • zero waste 49
Powered by Blogger.

Archive

  • ▼  2026 (8)
    • ▼  September (1)
      • Easy Homemade Fire Cider with herbs
    • ►  June (1)
    • ►  May (1)
    • ►  April (2)
    • ►  March (2)
    • ►  February (1)
  • ►  2024 (3)
    • ►  September (1)
    • ►  March (1)
    • ►  January (1)
  • ►  2023 (22)
    • ►  December (2)
    • ►  November (2)
    • ►  August (1)
    • ►  July (1)
    • ►  June (1)
    • ►  May (3)
    • ►  April (3)
    • ►  March (3)
    • ►  February (3)
    • ►  January (3)
  • ►  2022 (65)
    • ►  December (5)
    • ►  November (3)
    • ►  October (5)
    • ►  September (5)
    • ►  August (6)
    • ►  July (6)
    • ►  June (4)
    • ►  May (6)
    • ►  April (5)
    • ►  March (7)
    • ►  February (7)
    • ►  January (6)
  • ►  2021 (58)
    • ►  December (5)
    • ►  November (6)
    • ►  October (6)
    • ►  September (8)
    • ►  August (6)
    • ►  July (7)
    • ►  June (5)
    • ►  May (4)
    • ►  April (4)
    • ►  March (3)
    • ►  February (3)
    • ►  January (1)
  • ►  2020 (20)
    • ►  December (1)
    • ►  July (1)
    • ►  June (4)
    • ►  May (6)
    • ►  April (1)
    • ►  March (2)
    • ►  February (4)
    • ►  January (1)
  • ►  2019 (19)
    • ►  December (2)
    • ►  October (4)
    • ►  September (2)
    • ►  August (3)
    • ►  June (2)
    • ►  April (2)
    • ►  March (1)
    • ►  February (1)
    • ►  January (2)
  • ►  2018 (68)
    • ►  December (1)
    • ►  November (2)
    • ►  October (1)
    • ►  September (4)
    • ►  August (2)
    • ►  July (10)
    • ►  June (4)
    • ►  May (5)
    • ►  April (8)
    • ►  March (12)
    • ►  February (8)
    • ►  January (11)
  • ►  2017 (153)
    • ►  December (13)
    • ►  November (10)
    • ►  October (35)
    • ►  September (13)
    • ►  August (11)
    • ►  July (9)
    • ►  June (1)
    • ►  May (12)
    • ►  April (13)
    • ►  March (16)
    • ►  February (11)
    • ►  January (9)
  • ►  2016 (90)
    • ►  December (9)
    • ►  November (13)
    • ►  October (8)
    • ►  September (12)
    • ►  August (9)
    • ►  July (12)
    • ►  June (7)
    • ►  May (6)
    • ►  April (5)
    • ►  March (2)
    • ►  February (4)
    • ►  January (3)
  • ►  2015 (54)
    • ►  December (4)
    • ►  November (1)
    • ►  October (1)
    • ►  September (4)
    • ►  August (1)
    • ►  July (22)
    • ►  June (4)
    • ►  May (5)
    • ►  April (3)
    • ►  March (6)
    • ►  February (3)
  • ►  2014 (27)
    • ►  December (2)
    • ►  October (2)
    • ►  August (1)
    • ►  July (5)
    • ►  June (3)
    • ►  May (3)
    • ►  April (6)
    • ►  March (2)
    • ►  February (3)
  • ►  2013 (7)
    • ►  December (2)
    • ►  October (1)
    • ►  September (3)
    • ►  June (1)

SEARCH THIS BLOG


total page views

Most Popular Posts

  • DIY Easy Electroculture Plant Antenna
  • 12 Easy Hairstyles For Shoulder Length Hair | Long Bob
  • DIY Hair Growth Oil

Privacy Policy


Copyright © Homestead Herbs & Healing | holistic living. Designed by OddThemes