Homestead Herbs & Healing | holistic living
  • Start Here
  • Homestead
  • Herbs
  • Healing
  • Recipes
    • Breakfast
    • Main Course
    • Dessert
    • Snack
  • DIY
  • Minimalism
  • About Me

   reading time: 2 min


Have you ever heard of southernwood? Or perhaps one of its other common names, like southern wormwood, lad's love, lemon plant, or my personal favourite – maid's ruin?

Earlier this month I learnt about it and harvested it on the grounds of the horse farm where I help out every week. In German it also bears the name Cola-Kraut which translates to "cola herb" because of its scent that is reminiscent of the gummi cola bottles.

The Artemisia abrotanum is an extremely aromatic herb – or rather, a deciduous shrub, and actually a member of the sunflower family – that emits both a pungent and citrusy scent and has an intense bitter camphor taste with a cooling effect similar to mint. (A lot of comparisons in that description, I know, haha!) It has been used both as a culinary and as a medicinal herb that
aids digestion and improves liver function.

The young shoots can be eaten to flavour pastries and pudding, or to season very fatty meat as it because of its digestive bitter substances. I wouldn't actually eat it, however, due to the very intense, bitter, sharp taste that I described earlier – instead, I use it to make an absolutely refreshing herbal lemonade with it 😍 That way it gives off its unique flavour without tasting unpleasantly harsh. In the same way, you can use southernwood
to make a digestive tea.

By the way, the volatile oil in the plant's leaves makes southernwood not only a nice air refresher, but also a great companion plant for cabbages and other plants, as the
strong, sharp scent repels cabbage moths, fruit tree moths, and ants. It can also keep away moths from your wardrobe, so dry some southernwood if you spot one, and place it into a little pouch, like a lavender bag. This insect-repellent quality can also used to deter mosquitoes, for example by crushing the leaves and rubbing them on your skin! (Perhaps you could even make your own "bug off balm" using southernwood?! I will have to give that a try ...)

But now – let's talk about this wonderful lemonade! Or as I like to call it, the "Southernwood Soda".


REFRESHING HERBAL LEMONADE

Preparation time: 2 mins
Main ingredients: apple juice, southernwood, lemon juice
difficulty level: easy
makes: 1 litre (4 cups)
suitable for: vegan, lactose-free, gluten-free, soy-free, nut-free, low-fat

Ingredients:

800 ml (about 3 1/4 cups) organic apple juice, naturally cloudy
200 ml (about 3/4 cup) water or ice cubes
a handful or about 4-5 twigs of southernwood
juice of 1/2 lemon
a few slices of organic oranges
(optional) 1 tbsp elderflower cordial


Instructions:

Combine everything in a bottle or jug that holds 1 litre / 4 cups of liquid.

Place in the fridge to chill for a few hours, and enjoy!

If you find the apple juice too sweet, simply dilute the lemonade with more water or ice cubes – so refreshing!


Other refreshing beverages you might enjoy:

Sparkling Elderflower Cocktail
Homemade Ice Tea
Green Juice in a Blender
Homebrew Kombucha


♥

Maisy


 reading time: 2 min


Yay, finally another foodie blog post again!

Do you love coconut as much as I do? Then these bounty bar bites are just right for you!

I made these yummy coconut chocolate truffles for my boyfriend's sister's birthday who looooves Bounty. (She also got real Bounty bars for her birthday, so we'll see which ones are better 😜)


They are moist in the best way possible, not quite as sweet, lusciously coconutty, and coated in dark(er) chocolate that creates a wonderful contrast to the tropical filling. Oh, and not to forget a hint of salt to heighten the flavour!

To make these truffles even healthier, you could make your own chocolate using cacao butter, cacao powder, and sugar or maple syrup.

While my homemade vegan version is definitely a lot healthier than the original, it's important to remember that these homemade bars are also very rich and should therefore be eaten in moderation. (Sooo like, only three in one sitting, right?! 😉)

 reading time: 13 min


Are you itching to grow your own veggies, but don't have a garden? Or maybe you do have a garden, but the native soil quality in your area isn't great (too rocky, too sandy, too clayey …), or you have an issue with moles, rabbits, voles, gophers in your backyard … or, let's face it, you just don't want to strain your back and knees hunching over the low-lying garden beds all the time …

Make way for the raised garden bed!

Ever since moving out of my parents' house twelve years ago, I haven't had the luxury of a garden to call my own. Most of the time I lived in shared flats, and it was only four years ago that I moved into a shared house that came with a pretty big roof terrace. Since we don't have any lawn or dirt up there, we've had to make do with lots of planters and raised garden beds. Or until recently, only one raised bed.

So I decided that another one was called for.

What our roof terrace "garden" looked like 3 years ago: 1 relatively new DIY raised bed, and a bunch of planters ...

... versus what the old raised bed looks like now, compared to the new one. What was once a sea of Swiss chard is now drowning in calendulas, lol!


But even if I will have a "real" garden one day (which is the ultimate goal! A nice small house with a large garden, loads of edible and medicinal plants, and space for our guinea pigs and future chickens …), I will definitely keep the raised beds! Firstly because of all for the reasons I just mentioned, and secondly because I like the look of them. I think they look very tidy and pretty, and since they are more or less mobile, they can be placed anywhere on your property, whether that's on the balcony, a patio, along the house wall, or in the midst of your in-ground garden beds.

Plus, making your own raised garden bed(s) is very easy – and not very expensive!

But see for yourself ...


YOU WILL NEED:

  • (optional) 1 wooden pallet to allow drainage (mine measures 120 cm x 80 cm x 13.5 cm / 47 x 31.5 x 5.3 inches – not needed when placing the bed on soil or lawn)
  • 6 cedar or fir boards the length of the pallet (mine are 120 cm x 11 cm / 47 inches x 4.3 inches)
  • 6 cedar or fir boards the width of the pallet (mine are 80 cm x 11 cm / 31.5 x 4.3 inches)
  • 4 cedar or fir posts (either the height of your raised bed, which in my case would be 46.5 cm / 18 inches, or higher – I chose to make them stick out, so they are about 55 cm / 21 inches long)
  • hardware cloth or garden fleece that matches the floorspace of your raised bed (mine is 120 x 80 cm / 47 x 31.5 inches)
  • pool liner or dimpled sheet enough to cover the inside walls of your raised bed (in my case 400 cm x 33 cm / 157.5 inches x 13 inches)
  • 52 screws (mine are 2.5 cm / 1 inch long)
  • 8 screws (mine are 7 cm / 2.7 inches long)
  • (optional) 24 nails (I used roofing nails – only needed when using dimpled sheet)

  • power drill
  • screwdriver
  • staple gun
  • measuring tape
  • pencil
  • straight edge
  • sandpaper or sanding machine
  • work gloves
  • safety glasses
  • (optional) hammer (only needed when using dimpled sheet)
  • (optional) jigsaw (only needed to cut your boards/posts)

HOW TO MAKE YOUR OWN RAISED GARDEN BED (10 Steps):


Step 1 – Gather all of your supplies and tools

Make sure you have all your materials and tools ready. I actually decided to tackle this project on the spur of the moment, and luckily we had all the necessary supplies for the garden bed frame at hand.

Charge your drill, if it's battery-powered. Do you have something to drink nearby? Then let’s get started!

On day 1 we only had the supplies for the wooden frame at hand. Lining and filling to follow on day 2 ...


Step 2 – Layout and measure

In my case, the measurements of the boards are based on the measurements of the wooden pallet. Even if you don't have this guideline (e. g. because you are planning to place your raised bed in your garden and don’t need that drainage), lay out all your pieces on a flat and level surface, and see what the outline of your planter would look like.

Do the pieces fit together, or is there some trimming to be done? Do you have enough space to work?

In my case, I happened to have 6 wooden boards that measured 200 cm / 78.8 inches, so exactly the length I needed to produce 6 boards 120 cm / 47 inches in length (for the long sides aka “front” and “back”), and 6 boards 80 cm / 31.5 inches in length (for the short sides). These would all be attached to the 4 posts that in turn were to be screwed to the pallet.


Step 3 – Cut wooden boards and posts to the right length (if they aren’t already)

If you, like me, weren’t able to have your boards and posts cut to the right length at your local hardware store, you will have to cut them accordingly now, using a jigsaw. Layout and measure again to make sure you’ve got everything at the right length.

Sand down the edges and corners of your wood using sand paper or a sanding machine, if necessary. You don’t want to have any splinters left on your boards.


Step 4 – Drill holes into the boards and posts

The next step before actually assembling the pieces is to pre-drill holes all the way through the boards and through the posts. This will prevent the wood from splitting.

Using a measuring tape and a pencil, measure and mark where your holes need to be. I drilled 2 holes into each post, where it made contact with the pallet, and 4 holes per board, where they made contact with the posts – except for the 2 top boards at the “front” and the “back” which got an additional fifth and sixth hole for more stability.

Drill straight down into the wood and try to keep it as level as possible.

Drilled holes into the boards. You can see we've already started to attach the posts to the pallet as well.


Step 5 – Attach posts to the pallet


Install the four posts in each corner. They will ensure that the planter doesn’t slip from the pallet.

For every hole you drilled into your posts, you will need to insert a long screw that will go through the posts and into the pallet, so 8 screws in total. I used 7 cm / 2.7 inch screws.

Again, do your best to screw straight into the holes, keeping it as level as possible.


Step 6 – Attach boards to the posts


Once the posts are fastened, take your first set of three
120 cm / 47 inches long boards (for the “front”).  I used 2.5 cm / 1 inch screws to screw the boards onto the two “front” posts from the inside, one at a time, starting at the bottom (4 screws for the lower two boards, 6 for the top board).

2 screws on the two bottom boards, and 3 screws for more stability on the top board.


Repeat on the other side with the other three
120 cm / 47 inches long boards (for the “back”).


Next, attach 3 of the shorter boards (80 cm / 31.5 inches) to one of the short sides, screwing them onto the posts from the outside this time.

The short sides are attached to the posts from the outside, as opposed to the long sides.


Repeat on the other side with the remaining three 80 cm / 31.5 inches long boards.

Already looks like a pretty neat garden bed, eh?

Yay, a raised bed!


Step 7 – Attach hardware cloth or garden fleece to the bottom of the planter

Now that the frame is done, it’s time to prepare the inside. Depending on whether you have gophers, voles, or other troublemakers in your area, you will need to use a hardware cloth or something similarly sturdy to keep off those nibblers!

If your bed will be placed on concrete or your patio (like our roof terrace), you won’t need any wiring – something like the garden fleece I'm using will suffice.

If aggressive weeds are a concern, add a layer of weed-blocking landscape fabric as well.

Whatever you choose to line the bottom of your planter, make sure it’s water-permeable to allow for drainage! Never seal off the bottom of the planter.

Use a heavy-duty staple gun (or wide head cabinet screws) to attach the wire or fleece to the pallet and/or the bottom sides of the bed, all along the edges.

Alternatively, flip the garden bed frame upside down, and attach the wire or fleece to the bottom edge of the bed.


OPTIONAL MEASURES FOR LONGEVITY:
- Consider adding a mending brace or a thin wood slat each to your long sides to support the boards and prevent them from bowing with time!
- If you want to prolong the lifespan of your garden bed, it’s best to seal the wood from the outside and the inside using a non-toxic wood sealer or natural tung oil.
- And if you want to go the extra mile, consider sealing the gaps between the boards using clear silicone.

On day 2 we attached the garden fleece to the bottom. When placing your raised bed on soil/lawn, make sure to use hardware cloth instead or in addition to this!

Step 8 – Attach pool liner to the sides of the planter

To prevent the wood from rotting over time (and also prevent any leaching of chemicals from treated wood into the soil), I highly recommend lining the sides of the garden bed with pool liner or dimpled sheet (dimples facing toward the boards). Use a staple gun to attach the liner to the wood, going all along the top edges, or use roofing nails to secure the dimpled sheet.

And ta-da! You’ve just built your own shiny new raised garden bed!! (Well, more or less shiny if you use an old pallet and old posts like I did, haha!)

We used dimpled sheet and roofing nails to line the inside of our raised bed.

Step 9 – Place in the right location (if it isn’t already)

The last – well, second to last – thing to do is put the raised bed in place. Definitely do this before filling because by then this thing will be heavy!!

It’s best to choose a location that is as level as possible, and receives full sun (or as much as possible). Also, keep in mind that your raised bed might cast a shadow on its surroundings, so make sure nothing is unfavourably shaded by it.


Step 10 – Fill your planter

Now comes the fun part: Filling the planter with all sorts of goodies! Since most common vegetable plants need a minimum of 30 cm / 12 inches of soil to thrive, your raised bed should have a minimum depth of said 30 cm / 12 inches (or even better 45 cm / 18 inches).

In our case, the soil depth comes up to 33 cm / 13 inches, so all good.

https://i.pinimg.com/564x/7c/f2/1b/7cf21b2d7db127bc63be60ce237b9f22.jpg
Different layers of soil in a raised garden bed. (source?)


The other important thing to know is that you don't want to put "potting soil" only into your planter. Instead, you want to make sure to put in 4 layers of filling (which should be replaced every 5 years):

  • 1st layer (about 1/3 of the planter volume, so about 10 cm / 4 inches): coarse airy wood waste layer as drainage such as thin branches, twigs, shrub waste, rootstocks, wood chippings
  • 2nd layer (about 5 cm / 2 inches high): thin layer of chopped branches, leaves, turned sods, lawn clippings, plant residues
  • 3rd layer (about 1/3 of the planter volume, so about 10 cm / 4 inches): nutrient-rich layer of semi-mature compost, worm castings, animal manure (horse, cow, chicken, guinea pigs) and bedding
  • 4th layer (about 1/3 of the planter volume, so about 10 cm / 4 inches): dense layer of high-quality garden soil or potting soil, mixed with some mature compost (press down lightly after spreading, and replace annually after each harvest!)


1st layer: branches, twigs, and rootstocks

2nd layer: twigs, leaves, and grass clippings

3rd layer: guinea pig bedding with old hay and piggy manure

3rd layer: semi-mature compost from our garden compost, mixed with store-bought mature compost

4th layer: good-quality potting soil, mixed with some more store-bought mature compost


Now the planting can begin!

If you are just starting out, I suggest beginner-friendly plants like strawberries, squash, Swiss chard, lettuce, or radishes.

Look into companion planting, as some plants get along better with some than with others, and some can even cause issues when paired! For example, onion pairs very well with Swiss chard, and strawberries are good neighbours for beans – whereas potatoes and tomatoes are "foes", as are carrots and dill, which is why they should not be planted next to each other.

I highly recommend also including beneficial herbs and flowers that will a) attract and feed pollinators such as bees and butterflies, and b) help deter certain pests. Plus, it just looks very pretty to have a few bright blooms in the planter as well! You can't go wrong with calendula (especially great for tomatoes), basil (especially great for tomatoes, peppers, and oregano), thyme (especially great for cabbage), nasturtium (especially great for squash, cabbage, cucumber, and tomatoes), and cosmos.

To make things easier, you may also consider installing drip tape irrigation to save water – and mainly save you a lot of time. Because let me tell you, watering all those plants every day in summer takes time!


The finished raised garden bed with direct-seeded radishes, spinach, Swiss chard, lettuce, beetroot, and nasturtium. I also marked where our red cabbage and kohlrabi plants are going to be transplanted next month (centre and top).


THE PRICE POINT

Of course, the actual cost of a self-made raised garden bed depends on many factors, such as the type of wood you choose, what you use to line the bottom and sides, whether you add wood sealer, and which soil you purchase.

For example, at our local hardware store you can get:

- 6 Douglas fir boards (200 x 14.5 cm / 78.8 inches x 5.7 inches) for 45 € which is enough to make the entire frame
- 1 piece of fir wood slat (200 x 4.8 x 2.4 cm / 78.8 x 2 x 1 inches) which is enough for the four corner posts for just 1.70 €
- 2 square meters garden fleece for 3.98 € (you'll only need part of it)
- 4 square meters pool liner for 6.38 € (you'll only need part of it)
- a packet of 100 2.5-cm screws for 5.95 € (you'll only need half of it)
- a packet of 20 7-cm screws for 4.95 € (you'll only need half)

Total: 67.96 €

For reference, at the same hardware store a ready-made raised garden bed of similar size costs about 100-150 €. That means, if I'm doing the maths correctly, you are saving about 32-72 € with this do-it-yourself raised bed! And you have the liberty to design everything exactly the way you want it (or use leftovers and spend next to nothing on this!).

You'll notice that the wooden pallet isn't listed above. That is because it's a) optional, and b) you can usually get one-way wooden pallets for free from companies that have a warehouse (for example, the publishing house I used to work for, had plenty of them, as does my neighbour who owns a construction company). So it's definitely worth asking around instead of purchasing one!

In my case, we actually only spent as little as 3.98 € on our DIY raised bed! Why? Because we made do with what we already had at home: the old wooden pallet was gifted to us from said neighbour years ago, the posts were lying around in our garden, and the boards were left for us from the former house owners (they are actually spruce panels with tongue and groove and a transparent varnish – we were thrilled to finally have found a use for them!). We also got leftover dimpled sheet from my mum’s community garden for free, and the screws were also "leftovers" from other projects. So all we actually paid for was 23.18 € for 40 litres of organic raised bed compost (half of it for the 3rd layer, the other half for the 4th layer) and 80 litres organic raised bed potting soil (you will need about 100 litres of humus soil for the 4th layer), and 3.98 € for the garden fleece! That's zero waste for you! 😉

Since we used a bunch of old wood, it might not last as long as using high-quality cedar or redwood that has been sealed – perhaps only 5 or 7 years instead of 10 or up to 20 years – but honestly, that’s still worth it to me! (After all, our other DIY raised bed has been going strong for 3 years now, also using an old untreated wooden frame of some sort and an old untreated wooden pallet that were both gifted to us, and there’s no sign of it falling apart any time soon!)

All in all I can only urge you to always use what you have instead of buying new stuff! I mean, you don't even need a fancy pool liner or dimpled sheet – just use some old covering sheet if you have some lying around. Or, if you don't have any material lying around, you can get things like scrap wood off of craigslist or the like for free or very cheap.


August update. What the raised bed looks like almost 1 month later: radishes (centre), nasturtium (front), beets and lettuce (left), swiss chard and green onions (right) are thriving! The red cabbage has been transplanted and is hiding amidst the radishes that we are going to harvest this week. The two large brassicas in the back are Brussels sprouts (left) and savoy cabbage (right back). The kohlrabi is already waiting to be transplanted in the left back. Success!
The only thing that didn't make it is the spinach, unfortunately. But I might direct-sow another round once the radishes are gone ...


Happy gardening, my fellow crazy plant ladies and lads!


♥

Maisy

  reading time: 14 min

Can you spot our furry little neighbour?

For the longest time my dream was (and it still is, don't get me wrong) to live in a small house – a cute cottage perhaps – with a big garden that has lush rose bushes, berry bushes, apple trees, wild flowers, medicinal herbs, loads of homegrown vegetables, and enough space to keep 4 chickens, 2 dogs and my 3 already-existing guinea pigs. Oh, and ideally the property adjoins to a horse pasture. Thank you.

I saw people like Rachel Talbott with her dogs and cats and goats and ducks and whatnot, living the country farm life, and Carrie Rad with her magical piece of land and her precious pets, her amazing aesthetics, and not to mention her dream relationship, and Madeleine Olivia who is a pro at home-renovating and manages her gorgeous Georgian country farmhouse in the Cornish countryside (jelly!), and Deanna from Homestead & Chill who not only manages to create and care for the most amazing vegetable and flower garden, fruit orchard, chickens, cats, website, but also ferments her own food, makes and sells her own homemade products such as balms and salves, sourdough starter, baths salts etc. – and all that with just the help from her husband!!

As you can probably see, my expectations of what homesteading looked like – and what I wanted my own life to look like – were sky-high.

I needed a reality-check.

So what is homesteading, really?

According to Merriam-Webster, the verb homestead means "to acquire or occupy as a homestead" – which in turn refers to "the home and adjoining land occupied by a family". Homesteading, according to Wikipedia, "is a lifestyle of self-sufficiency. It is characterized by subsistence agriculture, home preservation of food, and may also involve the small scale production of textiles, clothing, and craft work for household use or sale. (...) Homesteading is not defined by where someone lives, such as the city or the country, but by the lifestyle choices they make."

In other words, whether you are a "homesteader" or not is not determined by where you live (and whether you own several acres of land and a dozen cows), but rather how you live.

In my blog post »Courage, Dear Heart« is now »Homestead, Herbs & Healing« from a few months ago I write that the word "homestead" on my blog name doesn't really reflect my current reality, but is rather an "affirmation" of what I want to achieve in my life. It's almost hilarious now to realise that I was already living a homesteading life – just not on a large scale like the amazing people I mentioned at the beginning of this blog post!!

And I didn't even realise it.

My homesteading vision board

Why homesteading?

There are a multitude of reasons why people decide to homestead. There seems to be some kind of a "wave" over the past few decades of people returning to a more "traditional", more slow-pace type of living, both in urban and suburban settings, like ours, and in the more common rural setting. Others, as I understand it, strive to be more or less completely self-sufficient and independent from the system.

As for me personally, I am drawn to a homesteading lifestyle for several reasons:
- I simply enjoy working with my hands, digging my fingers into the dirt, or kneading a soft dough, and feeling with all my senses (as opposed to working on a desk all day long, which is what my current daytime job requires)
- Working in the "garden", aka our roof terrace, living more seasonally and going wildcrafting re-connects me with nature and our surroundings, which is very grounding and soothing for me
- There is something very rewarding in harvesting the fruits of your labour, literally
- I love tending to my indoor and outdoor plants, my pets, my home – and to me, it is just much more rewarding to work for myself in that way, and to spend time on my own projects/novels instead of working on other people's projects/novels (as I have been doing as an editor over the past 4 years) which have no meaning for me and actually dry up my creativity
- I love working from home and, like I said, on my home (I've talked about this in my article on Why Mrs. Midwest Is No Longer My Role Model – I actually enjoy most of the homemaking tasks of a "traditional" housewife who works from home and takes care of the household, minus the sexist attribution of gender roles like housekeeping being "an integral female trait" (geez!), and also minus the cooking, which I'm not as fond of)
- While my goal is not self-sufficiency, I do think it's quite handy to be not entirely reliant on supermarkets and wholesale companies either (as the pandemic probably made us all realise)
- Knowing how to grow vegetables, how to cook from scratch, how to sew by hand or by machine, how to fix a dish washer, how to forage for edible wild plants etc. are valuable skills that will make you more wordly-wise and also more confident about your place in this world, because you kind of know and understand what is going on around you, if that makes sense
- My boyfriend and I also love thinking of more sustainable, creative solutions, for example how to include renewable energy sources such as solar, water and wind power in our life, to live as sustainably and eco-friendly as possible
- In a nutshell, I crave a more simple, more hands-on lifestyle in close touch with nature where I still have enough flexibility to write on my blog, work on novels and short stories, and just try out a bunch of different things that interest me, from fermenting more foods to doing macramé, making my own ceramics, or even eventually selling homemade goods such as soaps, lip balms, bath salts etc. (not yet though ☺️ so far I'm just selling kombucha SCOBYs, sourdough starter, and plant cuttings and seedlings, which is also fun)


How my journey started: microgreens sprouts in the kitchen, and tomato plants in the bedroom of my shared flat!

How I homestead on a small scale

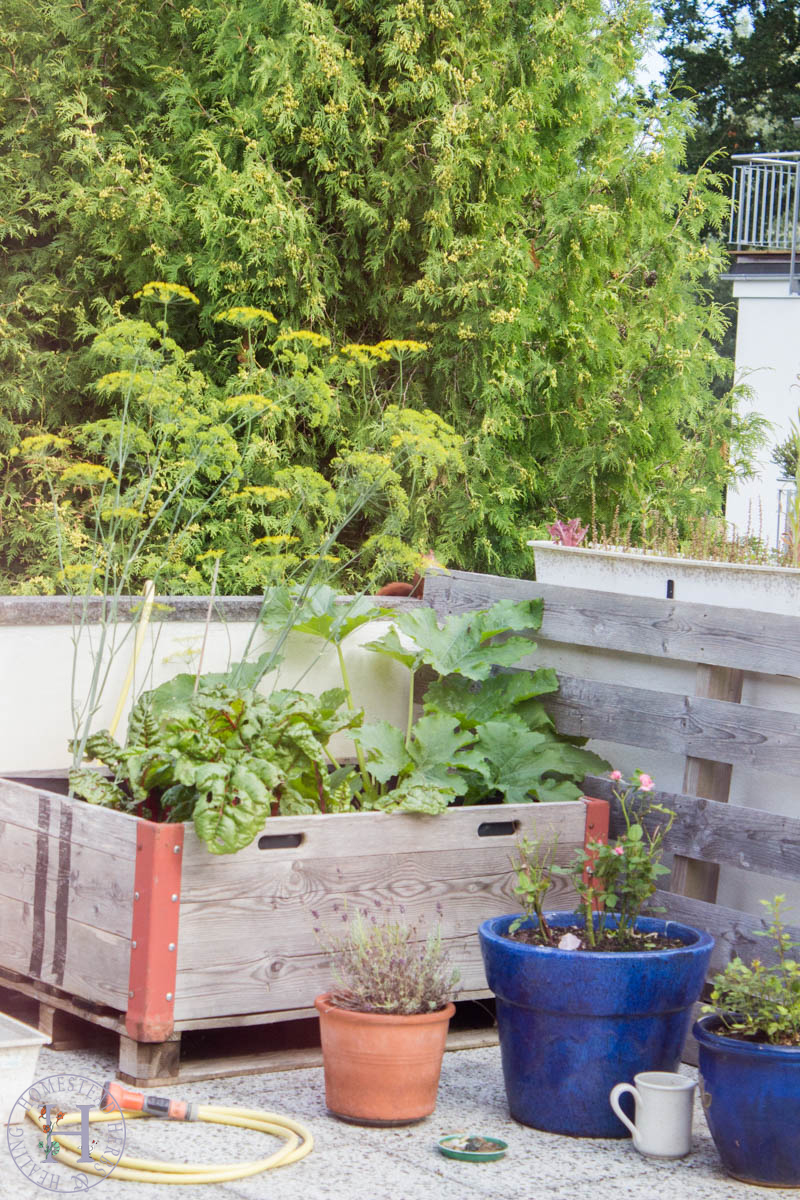
So I live in the suburbs with my boyfriend, in a flat so to speak, or rather the top half of a detached house in the outskirts of my home town in Northern Germany. We are honestly very lucky to live here, and we couldn't have afforded it if we didn't share the house my boyfriend's sister and her husband. It's not the dream home I described earlier, but it's definitely a privilege to live in a 100-square meter flat with a balcony and a roof terrace where we keep two raised garden beds and a collection of planters – and technically we can use half of the garden which has a bunch of beautiful trees and shrubs, which we don't really use because we can only access it by using the entry door on the ground floor for which we need a key. And also because we're then directly in front of the living room of our neighbours.

Anyway. So this is what we're working with.


Cooking from Scratch

Looking at my blog content, this is no surprise. Cooking and baking are some of my favourite ways to homestead. We have four monthly meal plans for each season, and we almost never order food or go out to eat, perhaps five times a year.

If cooking is a challenge for you, learn to make at least three or five meals that you enjoy! If you don' know where to start, look at your favourite meals, and try different recipes to make at home until you find the one that you can master :)

Or you could make your own snacks every now and then, or make your own granola for a change.

A couple of things that I do not buy any more, but make myself, are smoothies, green juice, and cake. Not only do you know exactly what goes into your meals if you make them yourself, but it's also that much cheaper! And often times – even more delicious ...


Growing Garden Basics

When I was still living in a shared flat with four other people, I planted a windowsill herb garden with things like mint, thyme, lettuce, chives and parsley as well as two tomato plants. Yes, I grew those tomatoes indoors! (see above) I also sprouted microgreens indoors from time to time. So you don't even need a balcony, not to mention a garden, to grow a couple of herbs to enjoy in your meals.

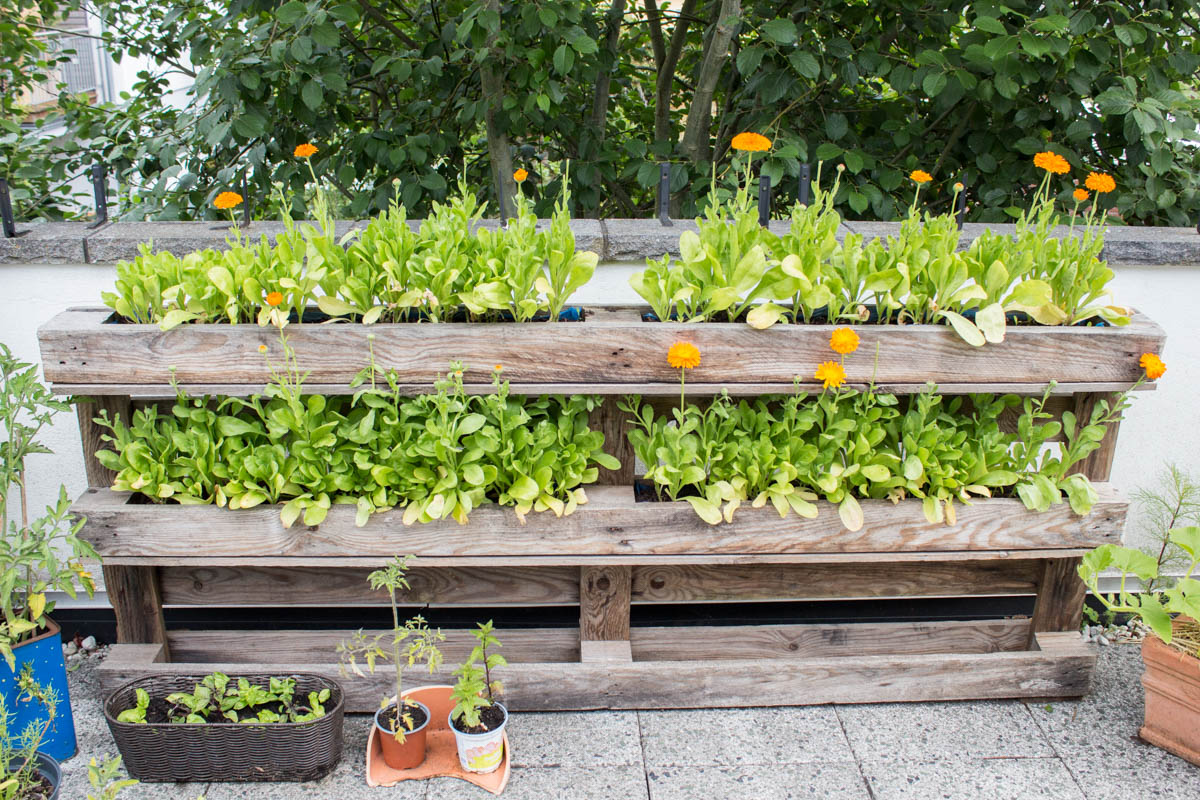
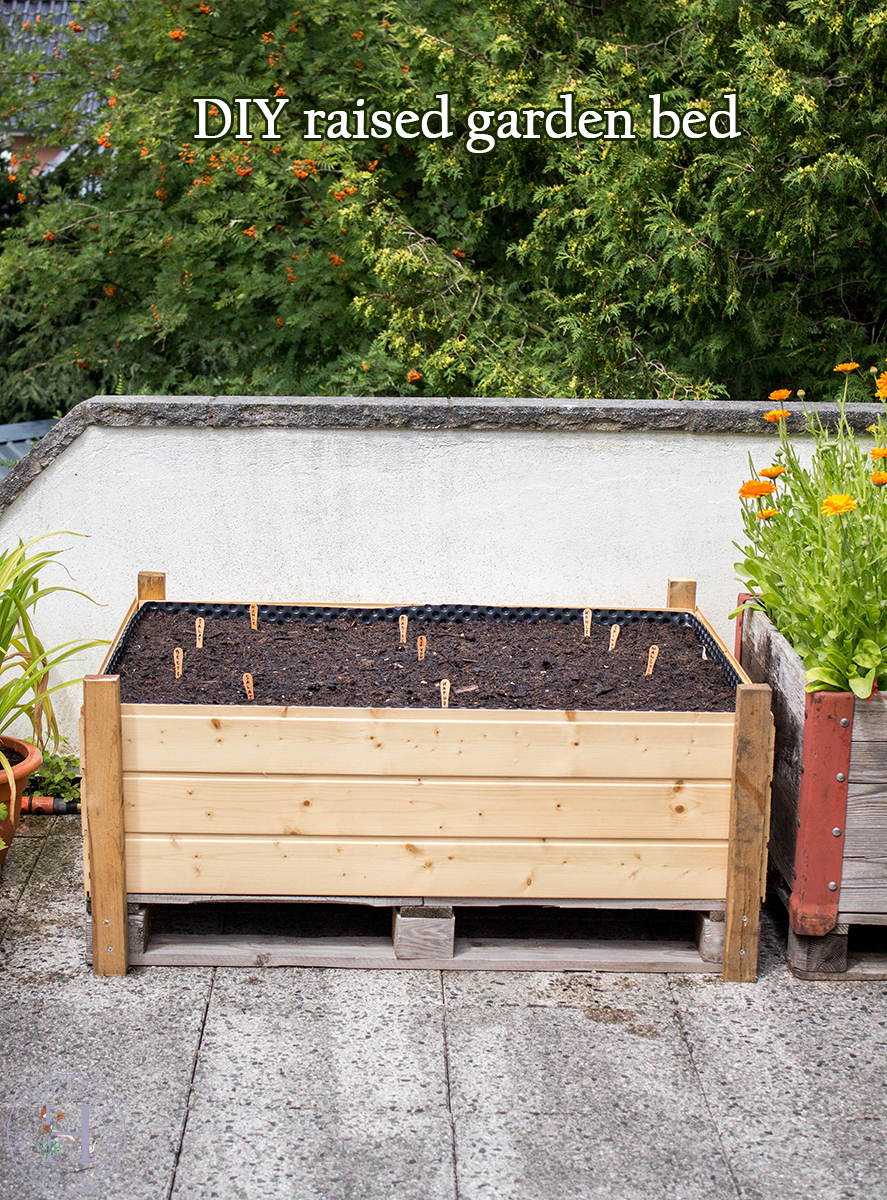
Now that we do have a balcony and a roof terrace, for which I am very grateful, we have more space to grow food. Great beginner-friendly plants we grew in the first year were lettuce, mint, and Swiss chard, as well as tomatoes and zucchini in our second year. This year we have even more planters available, including two DIY raised garden beds, in which we are growing two varieties of strawberries,
radishes, carrots, Swiss chard, lettuce, tomatoes, zucchini, Hokkaido pumpkin, cucumber, green onions, dill, basil, mint, oregano, parsley, sage, tarragon, and the tiniest blackberry that can survive in a little planter. Lastly, we have an apple tree, a plum tree (that doesn't produce much fruit) and a raspberry bush in the garden.

For this late summer, I'm also starting kohlrabi and red cabbage inside, and we're going to direct-seed more lettuce, Swiss chard, radishes and our first batch of winter lettuce later on.

This might sound like a lot, but most of those are just one single plant per vegetable, so it's just enough to spruce up a few meals and have fun digging your hands in the dirt :)

If you are just starting out, I recommend planting what you like to eat. So what are your most-used vegetables when cooking? Grow those! (Unless it's something very exotic and fussy like, say, artichokes which are not be the best for beginners.)

Don't forget to determine your hardiness zone to ensure gardening success! For reference, I live in zone 7.

Impressions of this year's garden beds: strawberries (and dill), cucumber, carrots, lettuce, Swiss chard, basil (in the midst of zucchini, calendula, and oregano).


Growing Medicinal Herbs & Flowers

Flowers and herbs don't just look pretty, they can also be used to benefit your garden (by attracting pollinators and possibly deterring pests) and to use them for medicinal purposes. Great examples are calendula, echinacea, chamomile, lavender, St. John's Wort, valerian, lady's mantle, yarrow, meadowsweet, elecampane, comfrey, and many, many more.

Right now I'm growing and harvesting lavender, calendula, sage, greater celandine, lady's mantle, lungwort, and aloe vera (indoors). I'm also drying mint leaves for tea, and use my fragrant roses for things like rose water, bath salts, and yoni steaming.


Making Skin Care & Beauty Products

Speaking of roses and calendula, these are not only amazing healing plants, but can also be used to make your own beauty and skin care products. Some of the first homemade beauty products I made were hair masks, facial masks, lip balm, body scrub, and body lotion bars. By now, I also make my own clay shampoo, rose water, herbal hair rinse, hair oil, yoni oil, toothpaste, soap, sunscreen, beard balm for my boyfriend, and more.

Of course, there are also a bunch of non-beauty related household products you can make such as your own cleaning agents (so far I really only make my own yoga mat spray, lol), or your own organic mosquito repellent, or your own fertilizer – I currently make mine using banana peel, comfrey leaves, or nettles.

You can use homegrown or foraged herbs to make homemade beauty products like tinted lip balm and lotion bars.


Preparing and Preserving Food

Whether you are growing your own food or not – preserving food is definitely something to look into. If you have a neighbour or a mum that has a fruit tree, they will probably be very glad to share their fruits with you. For example, last year we got tons of pears from my mum's garden, as well as apples from my mum's neighbours, and plum's from my boyfriend's aunt – and so I spent a couple of hours in the kitchen making apple butter, pear sauce, plum crumble, and plum chutney (click here for the recipes).

Or you are hit by the annual "zucchini flood" from your own garden, and need ways to process them. It's good to have a few recipes at hand to make so you don't get bored from the same stuff again and again. If you don't know what to make with your harvest, but don't want it to go to waste, just wash, chop, and freeze. That way you're more flexible in the way to use them later on.

Other ways to prepare and preserve your food could include dehydrating fruits and veggies, canning tomatoes, making your own homemade vinegar, making your own vegetable broth, etc.

If you don't have your own veggies you need to preserve, you can buy seasonal foods in bulk when they are abundant and cheap, and then preserve them for the winter months when fruits and veggies are more expensive. In my case, I've been going to a pick-your-own strawberry farm almost every year for the past 10 years or so, and came home with a bucket of strawberries which I froze or turned into smoothies. Same goes for the pick-your-own blueberry farm that we discovered last year (we made part of it into a delicious cake, ate another part of it, and froze the rest).


Fermenting Food

Fermenting is another traditional way of preserving food that also comes with the benefit of gut-healthy lactic acid bacteria. For example, you could ferment veggies (e. g. zucchini, peppers, green tomatoes, radishes, cabbage or cucumber) or fruits like lemons as a way to use up excess harvest. You can make kimchi, apple cider vinegar, etc.

For the past few years I've been homebrewing kombucha, and ever since this year I'm also baking sourdough bread every 1-2 weeks, and making my own yogurt. As of yet, I haven't done any pickling or lacto-fermenting of vegetables, but I'm very curious to try it!

From homemade sourdough starter to homemade sourdough bread :)


Foraging Wild Foods

Wildcrafting has become one of my favourite activities over the past three years! Even long before that I started out with wild apples and wild blackberries, and then fell in love with stinging nettle, elderflower, meadowsweet, ground elder, dandelions, and tree spinach. As of now, my list of wild foods that I use for cooking or to make beauty products etc. includes more than 30 plants, and I'm constantly adding more to my "list" ...

If you are just starting out, I recommend sticking with plants that are easy to identify, such as nettles, dandelions, and daisies, and exploring from there.

Great online resources that makes you want to go foraging like a little herb witch and create amazing recipes (besides my own blog of course 😜) are Gather Victoria, Grow Forage Cook Ferment, and for my German readers Zauberkräuter ("magic herbs").


Learning Handiness Skills

In my opinion, homesteading also involves the maintenance, mending and possibly building of your home. That could mean building or repairing a fence, building a tool shed, or teaching yourself skills like plumbing, basic carpentry, or sewing by hand (to fix a ripped pair of jeans, or to make your own pillow cases and whatnot). Depending on your homestead, you might also need to operate heavy machinery, or learn how to cut down (or even just prune) trees. It could also mean installing a solar panel, or chopping firewood, or harvesting rainwater or grey water to use around your homestead.

Or in my case, it means DIY-ing furniture like the bookshelf we made a couple of years back, the DIY pallet sofa that is not quite finished yet, two wooden guinea pig cages, or the homemade barn door that my boyfriend made me for my home office, as well as the flower box we made from an old wooden pallet, the new raised garden bed and the worm bin we are currently building. I also make little things like the DIY bird feeder and the air-dry clay giraffe planter.

This category can also be extended to making your own clothes, your own jewellery, your own decor, etc. Anything that starts with "making your own ..." counts 😉

Some of our DIY home projects: raised garden bed, barn door, bookshelf, and flower boxes (using an old wooden pallet).


As you can see from my own examples, homesteading definitely doesn't need to involve your own land – and not even a garden, heck, not even a balcony! Where ever you are, you can "homestead", if you like. If that means growing a couple of herbs in your kitchen to put into meals, making your own deodorant, or foraging for wild nettles in the spring, then that's great!

And if it means owning a dozen of cows, making your own milk and cheese, growing an acre of corn, or having a cellar filled with homemade goodies that get you through the winter, then that's awesome too!

What ever you do, don't compare yourself to strangers on the internet, like I did with the amazing ladies above 💛


START SMALL AND DO WHAT WORKS BEST FOR YOU!

♥

Maisy

Newer Posts Older Posts Home
View mobile version

THIS IS ME

Well, hello! My name is Maisy (pronounce: macy) and I’m the creative spirit behind this blog. You are welcome to join me on my journey to a more natural, slow-paced & healthier life!

SUBSCRIBE & FOLLOW

TRENDING THIS MONTH

  • DIY Easy Electroculture Plant Antenna
  • How To Marie Kondo Your Life (and not just your stuff)
  • Hot Wintry Butterbeer (vegan)
  • DIY Hair Growth Oil
  • DIY Yoni Oil | Feminine Hygiene Care

Categories

  • Ayurveda 17
  • beauty 39
  • breakfast 69
  • dessert 207
  • diy 48
  • fermenting 8
  • fictional food 21
  • foraging 30
  • gardening 8
  • gluten-free 115
  • healing 71
  • herbs 27
  • homestead 114
  • main course 35
  • minimalism 39
  • snack 106
  • sugar-free 110
  • zero waste 44
Powered by Blogger.

Archive

  • ►  2024 (3)
    • ►  September (1)
    • ►  March (1)
    • ►  January (1)
  • ►  2023 (22)
    • ►  December (2)
    • ►  November (1)
    • ►  August (1)
    • ►  July (1)
    • ►  June (1)
    • ►  May (4)
    • ►  April (3)
    • ►  March (3)
    • ►  February (3)
    • ►  January (3)
  • ▼  2022 (65)
    • ►  December (5)
    • ►  November (3)
    • ►  October (5)
    • ►  September (5)
    • ►  August (6)
    • ▼  July (6)
      • Refreshing Herbal Lemonade (aka Southernwood Soda)
      • Easy Vegan Bounty Bar Bites | Coconut Truffles
      • How to Build an Easy DIY Raised Garden Bed
      • Why Homesteading? + How to Homestead on a Small Scale
      • Sun Warrior Smoothie (vegan)
      • My Period Essentials (natural, sustainable)
    • ►  June (4)
    • ►  May (6)
    • ►  April (5)
    • ►  March (7)
    • ►  February (7)
    • ►  January (6)
  • ►  2021 (59)
    • ►  December (5)
    • ►  November (6)
    • ►  October (6)
    • ►  September (8)
    • ►  August (6)
    • ►  July (7)
    • ►  June (5)
    • ►  May (5)
    • ►  April (4)
    • ►  March (3)
    • ►  February (3)
    • ►  January (1)
  • ►  2020 (22)
    • ►  December (1)
    • ►  July (1)
    • ►  June (4)
    • ►  May (6)
    • ►  April (1)
    • ►  March (2)
    • ►  February (5)
    • ►  January (2)
  • ►  2019 (21)
    • ►  December (2)
    • ►  October (4)
    • ►  September (4)
    • ►  August (3)
    • ►  June (2)
    • ►  April (2)
    • ►  March (1)
    • ►  February (1)
    • ►  January (2)
  • ►  2018 (68)
    • ►  December (1)
    • ►  November (2)
    • ►  October (1)
    • ►  September (4)
    • ►  August (2)
    • ►  July (10)
    • ►  June (4)
    • ►  May (5)
    • ►  April (8)
    • ►  March (12)
    • ►  February (8)
    • ►  January (11)
  • ►  2017 (154)
    • ►  December (13)
    • ►  November (10)
    • ►  October (35)
    • ►  September (13)
    • ►  August (11)
    • ►  July (9)
    • ►  June (1)
    • ►  May (13)
    • ►  April (13)
    • ►  March (16)
    • ►  February (11)
    • ►  January (9)
  • ►  2016 (97)
    • ►  December (9)
    • ►  November (13)
    • ►  October (8)
    • ►  September (12)
    • ►  August (9)
    • ►  July (13)
    • ►  June (9)
    • ►  May (6)
    • ►  April (6)
    • ►  March (3)
    • ►  February (5)
    • ►  January (4)
  • ►  2015 (70)
    • ►  December (5)
    • ►  November (2)
    • ►  October (2)
    • ►  September (7)
    • ►  August (2)
    • ►  July (24)
    • ►  June (6)
    • ►  May (5)
    • ►  April (4)
    • ►  March (8)
    • ►  February (4)
    • ►  January (1)
  • ►  2014 (38)
    • ►  December (2)
    • ►  November (1)
    • ►  October (2)
    • ►  August (2)
    • ►  July (14)
    • ►  June (3)
    • ►  May (3)
    • ►  April (6)
    • ►  March (2)
    • ►  February (3)
  • ►  2013 (7)
    • ►  December (2)
    • ►  October (1)
    • ►  September (3)
    • ►  June (1)

SEARCH THIS BLOG


total page views

Most Popular Posts

  • DIY Easy Electroculture Plant Antenna
  • How To Marie Kondo Your Life (and not just your stuff)
  • Hot Wintry Butterbeer (vegan)

Privacy Policy


Copyright © Homestead Herbs & Healing | holistic living. Designed by OddThemes