Homestead Herbs & Healing | holistic living
  • Start Here
  • Homestead
  • Herbs
  • Healing
  • Recipes
    • Breakfast
    • Main Course
    • Dessert
    • Snack
  • DIY
  • Minimalism
  • About Me

 reading time: 4 min


As you all are probably aware by now, I'm a huge fan of herbs and all natural homemade body care products. Herbal hair rinses are a wonderful and easy way to keep your hair healthy and shiny. It is the perfect companion to the homemade clay shampoo I shared a while ago which needs an acidic rinse to neutralise any lime in the mineral clay. It easily fits into a no-poo lifestyle but can also be used with regular shampoo.

This rinse is vinegar-based and infused with beneficial herbs that help hair in a variety of ways. Apple cider vinegar gently cleanses the scalp, balances the pH of the scalp, clarifies your hair, adds shine and softness, and helps soothe scalp conditions due to its antifungal and antibacterial properties.

Depending on the herbs you use, this rinse can soften your hair, add luster to it by closing the hair's cuticle, stimulate hair growth, prevent oily build-up, relieve scalp issues like dandruff, enrich your natural hair colour, and more. It also helps to detangle your hair and make it more manageable.

This is also a wonderful hair treatment for hair loss after pregnancy :) Not that I have any experience with that ... Just give it a try!


  reading time: 7 min


So far we've used wild herbs like stinging nettle, dandelions, Himalayan balsam and meadowsweet in the kitchen. So far, so good.

But did you know that you can use hazelnut leaves for cooking?

Yes, hazelnut leaves. Specifically the young, tender ones that are currently growing on the hazel bushes, soft as puppy-dog ears. They can be eaten in the same way as stuffed grape leaves aka Greek dolmades, or sarma which is Turkish for "wrapped", and is a widely popular dish in the Southeastern European and Middle Eastern cuisine. Fillings for this kind of dish are usually something like rice, minced meat, along with spices and herbs.

Which is exactly what we are doing today. But plant-based, and using hazelnut leaves, which is basically the seasonal equivalent of the stuffed vine leaves.

The only important thing is that the hazelnut leaves are blanched in hot water before using them for this recipe to make them supple and aromatic-tasting. Then you stuff them with a filling of your choice – I made a white filling with wild herbs and white wine, and a red filling that is based on the typical vine leaf filling with tomato, parsley and onion. Wrap the filling into the blanched leaves, fry briefly, and enjoy!

But first, we'll need to forage for hazelnut leaves ...


Where and How to Harvest Hazelnut Leaves 

Hazelnut leaves – or hazel leaves – are the edible leaves of the hazelnut tree (Corylus avellana) which is a hardy deciduous shrub or tree, also known as common hazel, European hazel, or cobnut. It is native to many parts of the temperate Northern hemisphere, and is often found in hedgerows and deciduous woodland.

Hazel bushes prefer full sun or light shade, and they like to grow in light, well-drained, loamy soil which is kept moist. They tend to grow to heights of around 10 to 15 feet, forming a short tree or dense shrub shape with multiple stems. The leaves are smaller than most other deciduous trees, but broad, and are rounded in shape with serrated edges. Small male catkins and clusters of female flowers form in the spring. The fruits or nuts – the hazelnuts – grow inside short green, fuzzy husks that don't completely cover the nuts and are found underneath the leaves of the plant.

The leaves, flowers and fruits (aka hazelnuts) are edible.

The best time to harvest hazelnut leaves is from April to June, when they have a fresh, green colour and are velvety soft and tender, like puppy ears :-) Mature leaves that are picked later in the year are leathery and not suitable for consumption.

Consumed raw, the young leaves taste quite bitter and "earthy". If you want to use them raw, e. g. in a green smoothie or very finely chopped in a salad, I suggest using a maximum of 2-3 raw leaves in your smoothie. As a rule of thumb: Never put more greens (or fruits, for that matter!) in a smoothie than you can eat whole in one sitting.

The young leaves can also be blanched and preserved in high-quality cooking oil and salt, to eat later in the year in salads or with vegetable dishes.

You can also collect hazelnut leaves to dry and use them to make tea. Tea from hazelnut leaves is said to reduce cholesterol and intestinal problems.

Be sure to only pick leaves from a hazelnut tree that is not directly on the road to avoid any pollution. The safest option is a hazel bush that grows in your garden or in a secluded area such as woodland. Only harvest leaves that are whole, healthy and fresh. Avoid leaves that have holes or pests on them.


General Foraging Guidelines:
  • You should be 100 % certain you are identifying the correct plant. If you do not know what it is, DO NOT eat it! Do not pick if you're in doubt!

  • Don't harvest from contaminated areas such as busy roadsides, near industrial facilities, where dogs pee, along the edges of agricultural fields, old landfill sites etc.

  • Be mindful & harvest sustainably. Only pick from areas that have a plentiful supply, and never more than 1/4 of a plant, ideally only about 5 %.

  • Leave the harvesting area litter-free.


 reading time: 5 min


Did you know that you can make your own 100 % plant-based and bee-free "honee" with only 3 simple ingredients? All you need is freshly picked dandelion flowers, water and sugar!

This floral honey has almost nothing to do with conventional bee honey, except that is also makes use of flower pollen, but it is equally deliciously sweet and rich, similar to a forest honey, with a slight citrus note, and has a gorgeous amber colour!

I haven't mentioned this in my post about dandelion cupcakes last week (which are delicious by the way, so give them a try!), but dandelion flowers
are not just pretty to look at, like little fuzzy suns – they also contain many vitamins and minerals. Dandelion honey is said to stimulate kidney and liver activity, metabolism and blood circulation as well as balancing blood sugar levels, reducing high blood pressure, stimulating glandular activity, aiding digestion and helping with rheumatic disorders. Since this recipe uses flower pollen, it may also help relieve seasonal allergies.

Dandelions also stimulate bile production, which is generally not an issue. If however, you are on bile blocker medication for any reason, please take that into consideration.

Whether you usually eat bee honey or not – give this dandelion honee a try! It's unique, pretty to look at, and beneficial for your health. Oh, and it also makes for a great edible gift 🌼

Make sure to gather your dandelion flowers in a low traffic area away from roads, parking lots, sidewalk or other areas where there can be road salts, runoff, animal waste etc. The areas should also be free of chemical treatments or fertilizer. Pick on a sunny day when the flowers are fully open. And of course, harvest just enough for what you need, and leave the rest for the bees and butterflies to feed on! 😊

 
VEGAN DANDELION HONEY

Preparation time: 1 hour (+ steeping time)
Main ingredients: dandelion flowers, sugar, lemon
difficulty level: easy
makes: about 2 honey jars
suitable for
: vegan, lactose-free, gluten-free, yeast-free, nut-free, fat-free

Ingredients

200 g (about 4–5 handfuls) fresh dandelion flowers
400 ml (~ 1 1/2 cups) filtered water
, boiling
2 organic lemons

360 g (~ 1 3/4 cups) light sugar, brown sugar or raw cane sugar

also:
- clean, sterilized jars with screw-on lids (I re-use old jam and honey jars that I sterilized with boiling water)
- a saucepan
- a nut milk bag, cheesecloth, gauze or fine mesh

Instructions

Preparing the dandelion flowers:

Place your freshly picked dandelion flowers outside on a kitchen towel or in a bowl or colander. Leave them out in a shady spot for about an hour or so to give
any creepy crawlies a chance to escape.

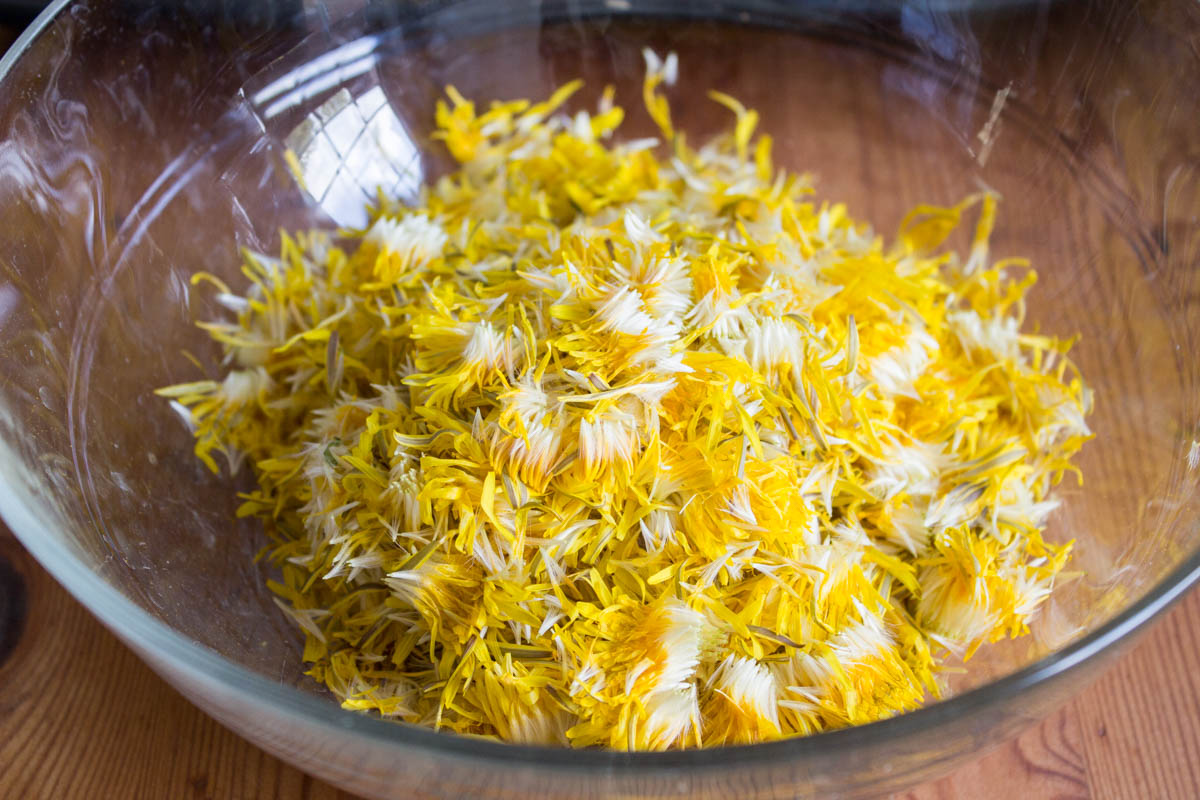
Pluck the yellow petals from the flower head, while discarding the green bits which are very bitter. You will need some patience for this process :) I personally enjoy monotonous tasks where I can get in touch with my thoughts and feelings, or listen to music or an audiobook.

(BTW: You can collect the leftover dandelion greens and give them to your chickens, bunnies, guinea pigs or goats! Or feed your compost with them.)

If you like, you can give your flowers a light spray of water in a fine mesh to remove any bits of dust of dirt before using them to cook, knowing that this will also remove most of the pollen. You can also use them unwashed, that way you preserve the pollen. It's up to you!

Making the
"honey":

Place plucked dandelion petals into a medium saucepan. Pour the boiling water over the petals, and add
2 organic lemons (squeezed and then sliced for maximum use), if using. Allow to steep for about 1 hour or up to 12 hours.

After steeping, strain the petals and lemons (I use a nut milk bag, but a cheesecloth or a fine mesh also works), wringing out every last bit of that golden juice that we want. Compost the leftover dandelion/lemon pulp.

Return the dandelion juice to the saucepan, add the sugar, and gently bring to a boil. Stirring occasionally, allow the mixture to boil lightly for about 20 minutes, or until thickened to your liking.

Please note that the syrup will be relatively liquid when warm, so check the consistency by letting it cool down (see notes below). It will thicken dramatically once at room temperature.


Once you're satisfied with the consistency, fill into sterilized glasses.

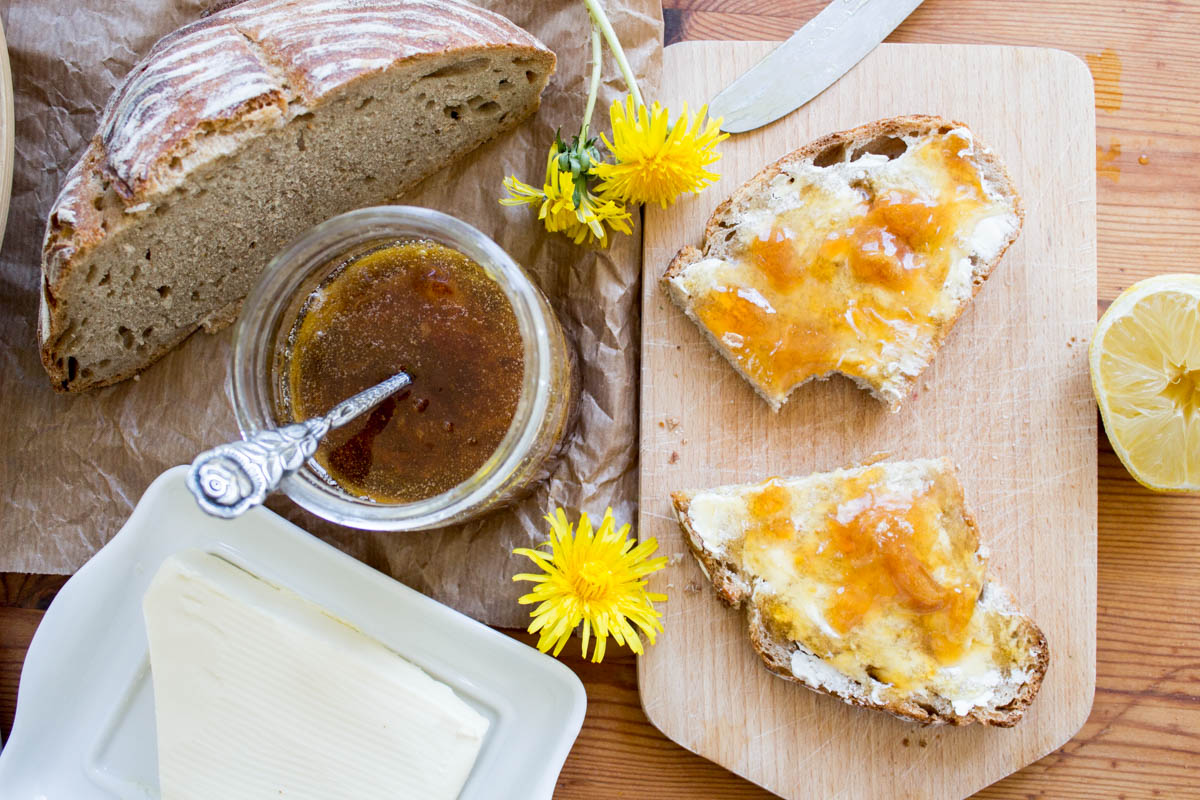
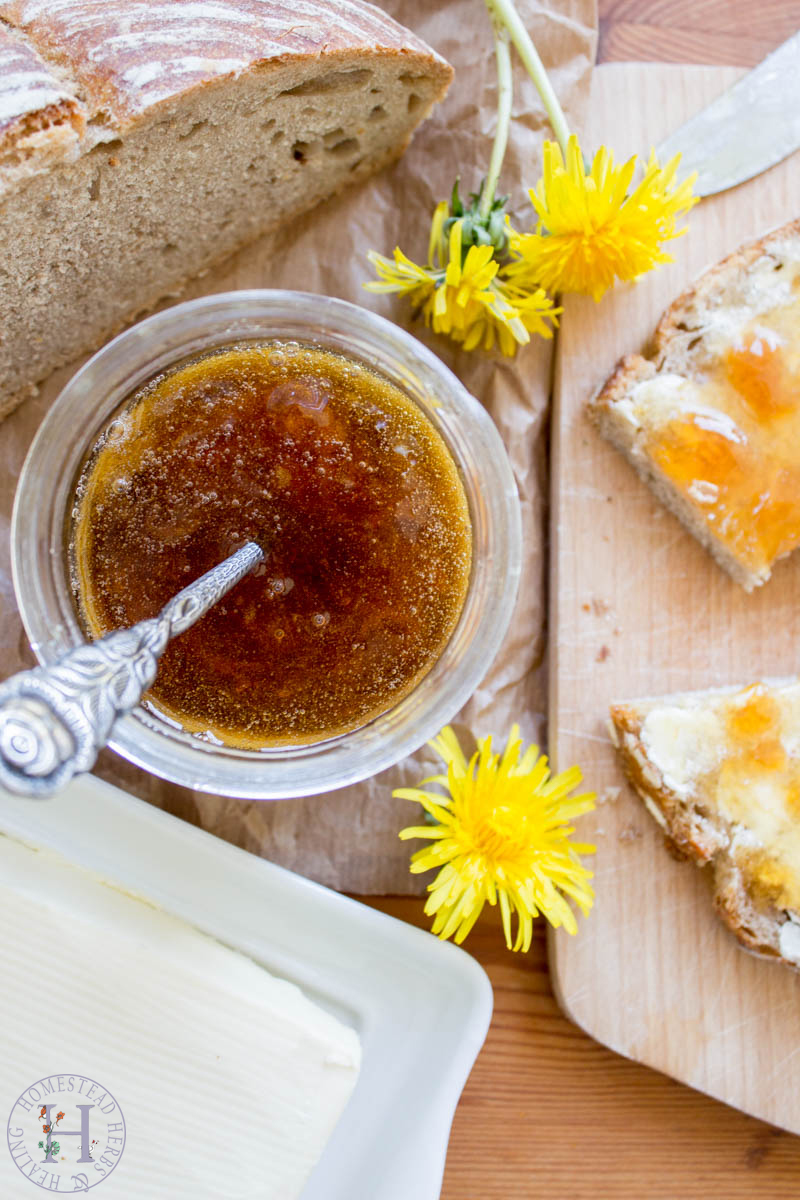
Enjoy over porridge, on fresh bread with butter (pictured is my homemade sourdough bread that I'm currently experimenting with 😍), for baking as a substitute for maple syrup or agave syrup, or even in a salad dressing for a touch of sweetness.

This honey also tastes great paired with (homemade) yogurt,
Greek-yogurt-with-honey style. Did anyone else eat this when they were younger?

Stored in a cool and dark place, this dandelion honey keeps for about 1 year.


TIPS & NOTES:
- To test the setting point, spoon a small amount of the syrup on a plate that has been placed in the refrigerator or freezer for about 10 minutes. After about a minute, you can push the syrup with your fingertip to see how thick it is. It can go from thin (like maple syrup) to viscous (like molasses or runny honey) to super sticky and thick (like caramel). Mine was definitely on the thick and sticky side, with 30 minutes of simmering time!
- Make flavour variations of this recipe by replacing the lemon with something like an orange or an apple, or adding herbs or flowers like rose buds or lavender or rosemary twigs (I'm thinking about adding apple blossoms to mine next time!), or spices like vanilla bean or ginger. You could also change up the flavour by using hot chamomile tea, apple juice or pineapple juice instead of hot water for steeping the dandelions.
- To make cough honey, add 2 cloves, 2 handfuls of fresh dandelion flowers (petals plucked), a fresh thyme twig or a few sage leaves, and 1 cinnamon stick to your jar of dandelion honey. Leave to rest in the sun for 2 weeks, then strain, and fill into a fresh jar.


General Foraging Guidelines:

  • You should be 100 % certain you are identifying the correct plant. If you do not know what it is, DO NOT eat it! Do not pick if you're in doubt!

  • Don't harvest from contaminated areas such as busy roadsides, near industrial facilities, where dogs pee, along the edges of agricultural fields, old landfill sites etc.

  • Be mindful & harvest sustainably. Only pick from areas that have a plentiful supply, and never more than 1/4 of a plant, ideally only about 5 %.

  • Leave the harvesting area litter-free.


♥

Maisy


  reading time: 4 min


Would you believe me if I told you that I spent 5 hours this month plucking dandelion blossoms?! Well, I did. 🤪 And one of the recipes I used them for are these marvellous dandelion cupcakes with a lemony cream cheese frosting. Sooo goood!

This recipe was totally inspired by the beautiful pictures of Colleen's Dandelion Cupcakes with Lemon Buttercream Frosting over at Grow Forage Cook Ferment, one of my favourite sites! But make it vegan and make it Maisy (in other words, how most of my recipes come about) 😁

And I have to admit that my aesthetics can't match Colleen's – but, more importantly, my dandelion cupcakes are frickin amazing!!

I made them for Mother's Day last week, and they are
moist
fluffy & dense at the same time
juicy
lemony
lightly floral
sweet
slightly "nutty"
& here to brighten your day and your taste buds!

The next time you see these bright and sunny faces in your garden, make these delicious cupcakes with them!!


A FEW TIPS FOR PROCESSING DANDELION FLOWERS:
- Pick the dandelion flowers in a sunny part of the day when they are fully opened.
- Everyone has their own preferred method, but during all those hours of plucking dandelion blossoms I found that it was the easiest to pull out the petals from the flower head when the flowers have been spread out for about 5 hours or so, and are starting to wilt. That way the floral bracts of most of the flowers will have "peeled back" so it's easier to get to the good stuff (the yellow petals). See pictures below!
- Instead of pulling out the petals by hand you can also use a pair of scissors to clip the yellow petals from the flower. A few bits of green won't hurt anything, but they are very bitter so try to keep them to a minimum.
- If you want, you can give the plucked or clipped petals a light spray of water in a fine mesh to remove any bits of dust of dirt before adding them to the batter. If you want, you can also put them into the batter unwashed, that way you preserve the pollen. It's up to you!


  reading time: 2 min


So, I lost a bet – and had to make a dessert for my fiancé and I.

(I hate losing bets! But I love dessert, so ...)

Since I had
recently discovered Alvin Zhou's wonderful recipe channel and in particular one his most recent recipes ("recent"), the 100-hour tiramisu, I felt inspired to whip up this easy vegan tiramisu-style parfait (aka individual sized tiramisu portions) that doesn't really have anything in common with Alvin's marvellous creation other than the name, haha!

Not as rich and decadent as the Italian original, but still delicious and much quicker and easier to make than a classic tiramisu which takes several hours and a lot more effort. (Did I mention that Alvin's tiramisu took 100 hours to make to be as heavenly as desired?)

So if you are in the mood for an easy dessert that is both light and chocolaty (or if you happened to lose a bet to your boyfriend ...), this vegan tiramisu parfait is just the thing you need!

reading time: 9 min


Ritucharya is the Ayurvedic practice of adapting your diet and lifestyle routine to the seasonal changes, and stay in sync with the seasons. So as the snow from the winter slowly melts away, the kapha energy (which is associated with feelings of heaviness, lethargy, sluggishness, melancholy or depression, and also an increase in mucus – such as coughs and colds – when elevated or off balance) that has accumulated over the course of winter, will also naturally melt away. It is the time of allergies, sinus congestion, hey fever and flu, and we often feel mucusy, sticky, dense, stuck and unmotivated.

In today's blog post I want to share with you a morning routine that is fitted to the Ayurvedic kapha season which begins in February and continues into late May.
 
It might look like an incredibly long morning routine, but first of all, it includes workout and breakfast, meaning you could start with your work and daily chores at about 8 a.m. And of course, feel free to adjust it to your liking and perhaps skip a few steps, depending on YOUR preference, YOUR body, and YOUR day to day life. I definitely don't do every part of this routine every day, but I try to incorporate as many elements as I can ☺️


6 a.m. – Wake At or Before Sunrise

At the moment the sun rises at about 6 a.m. where I live, so that's when I try to get up. (This also correlates with Ayurvedic recommendations to get up between 3 a.m and 6 a.m., which is a vata time of day and helps to compensate the sluggishness of kapha – the heavy kapha time begins at 6 a.m. and ends at 10 a.m.) Since the accumulated kapha energy makes us extra sluggish and prone to hit the snooze button on the alarm clock, it's important to get 8-9 hours of sleep every night, but still make it a practice to wake up before or by 6. o'clock, otherwise getting out of bed becomes harder and harder with every minute.

To help me wake up "naturally" I use a dawn simulating alarm clock – mine is very old, but I love it! It's the Philips HF3520 Wake-up Light, which gently starts emitting light 30 minutes before the set time – like the actual sunrise. If I'm not awake by 6 a.m., it starts to give off chirping bird sounds and gentle instrumental music.


Get Dressed + Make Bed

Before I do anything else, I get dressed, pull open the curtains, and make the bed. If you aren't making your bed yet, start doing it NOW! Small steps like this help with maintaining focus, getting your thoughts in order and maintaining self-discipline throughout the rest of the day.
 
Open the windows (unless you're super sensitive to pollen during this time of year) and let some fresh spring air in!


Oil Pulling

If I'm not in a hurry and need to rush out the door, I take my time to swish and gargle with coconut oil for about 10 minutes (you can also do as little as 1 or 2 minutes, so don't worry!). Oil pulling is an Ayurvedic technique that strengthens teeth, gums and jaw, while loosening up your sinuses and ridding your throat of mucus build up, as well as improving the sense of taste and your overall mouth odour. I've written an entire blog post all about this technique, so jump on over here to learn more.
 
Important: Avoid swallowing and spit the oil into the trash when you're done, instead of the sink – otherwise it will clog the drain!
 
While I do oil pulling I usually prepare my breakfast and feed our guinea pigs who are always the first to get their brekkie in our home.
 

6.15 a.m. – Brush Teeth + Scrape Tongue

Both after oil pulling and after brushing my teeth I always, always use my stainless steel tongue scraper to remove any bacteria and toxins that have accumulated on the tongue overnight. I also do this at night after brushing my teeth. It's just the best feeling to have a squeaky clean tongue! (Especially since the elevated kapha leads to a thick white tongue coat – yuck!) Again, you can read more about this Ayurvedic practice over here.


Nasal Rinse

To further flush out any excess mucus (even the word is gross!), I like to clarify my nose every now and then by using a nasal rinse cup or neti pot. I've done a separate blog post on that, too, which you should read, but basically what you do is you pour a mineral salt solution through your nasal passages. It feels a bit weird at first, but you'll notice the cleansing and moistening effect of this rinse. This is especially great for when you have a cold or flu, and to reduce or even eliminate seasonal allergies! If your nose feels dry afterwards, dab a bit of coconut oil on your pinky and apply to your nostrils.


6.30 a.m. – Splash Cold Water

To fully wake up I always splash some cold water in my eyes. Since I work on the computer all day they get strained easily, and cold water in the morning helps to soothe and relax the eyes – plus, it makes you feel more vibrantly awake! You could also take a cold shower instead (I prefer evening showers, so splashing my face it is).
 
Afterwards, I usually apply a natural skin cream with SPF, or some aloe vera gel.


Drink Warm Water

Most of us start our mornings with a hot cup of coffee or tea to warm our bodies after getting out of bed. And when we drink water, we tend to prefer it cold because it's refreshing, but according to Ayurvedic medicine, regularly drinking very warm boiled water, especially in the morning, can heal our bodies, providing digestive power and reducing metabolic waste that could have built up in our immune system. After eight hours of sleep, drinking a cup of warm water on an empty stomach can help cleanse your body by flushing out toxins, it improves digestion (which is especially sluggish during kapha season), aids constipation (again, very common during kapha season), improves blood circulation, prevents premature ageing, and keeps your skin clean of acne and pimples. It's also a nice way to gently wake up and refresh your body.
 
I usually drink 1 large mug of warm water (I pour 1/2 filtered cold water and 1/2 filtered boiled water). If you like, add some fresh ginger slices, or a spritz of lemon.


6.45 a.m. – Dry Brush


This is another topic I've done an entire blog post on, so jump on over here to learn more about it. But in short, you'll want to brush in long, sweeping strokes towards your heart, and brushing in circular motions around joints and stomach. You can use a dry brush, a sponge, raw silk gloves, or even a dry wash cloth. Dry brushing stimulates lymphatic drainage, which helps move lymph and excess kapha in the body, increases circulation, encourages detoxification, reduces muscle tension, and even helps with reducing and preventing cellulite and stretch marks.


Eliminate

Yup, do a Number 2! If I haven't peed right after getting up, this is when I empty my bladder and bowels. If you don't feel like it, just take some time to sit on the toilet every morning. Your body will adapt and get used to a specific time. Just give it a go ;-)

If you feel courageous, you might also try to take an enema as the ultimate way to eliminate toxins and flush out built-up waste in the colon. This also helps with acute constipation, and it might also help get rid of fatigue and allergies (due to built-up colon waste).

BTW: Another great way to "eliminate waste" is to clean out your closet and declutter as part of a seasonal spring cleaning!


7 a.m. – Green Juice

Speaking of flushing out toxins! As we all know, spring is the time for cleansing internally and externally – getting rid of excess kapha –, doing detoxes and cleanses such as panchakarma, and eating bitter dark leafy greens such as dandelion, stinging nettle, arugula and herbs. I usually also add a teaspoon of barley grass powder and/or moringa powder to my green drink. Bitter, astringent and pungent tastes are great for kapha season.

Another great way to get in those greens, and flush your body first thing in the morning, is making a green juice at home. If you – like me – don't have a juicer, check out blogpost on how to make green juice in a blender! The recipe yields about 5 cups of green juice or so, so if you're new to this, maybe start with cutting the ingredients in half or even 1/4. All you need is a good blender, a cheesecloth or nut milk bag, and choice of green fruits and veggies.


7.15 a.m. – Vigorous Exercise

Since the elevated kapha energy makes us lazy and lethargic, it's best to stimulate our bodies and our circulation with invigorating movement. Anything that invokes the elements of fire, air and aether will help shift the dense and heavy energy of accumulated kapha. Maybe play some upbeat music, and get sweaty! Great options are early morning yoga (choose something a bit more active and dynamic, such as a quick-paced hatha flow or yoga wash detox flow or power yoga break or core power wake up), a nice energizing bike ride or brisk walk, jogging, aerobic, dancing, kick-boxing, skipping... Anything to get your blood pumping and the juices flowing!
 
If you are doing yoga, try to include sun salutations, chair pose, or better yet: twisting chair, warrior poses, upward plank, headstand, bow pose, half moon pose and spinal rolls in your practice. Use a strong forceful breath during practice. Fire breath is also a great addition.
 
 
7.45 a.m. – Meditate

After waking up and shaking up my body I like to calm down again by doing 10 to 20 minutes of meditation. You could also include some breathing exercises at this point, for example fire breath or alternate nostril breathing. This is also a great time for journaling and reflecting. I love setting intentions every morning in my little daily intentions journal! Or how about a mindful walking meditation through nature perhaps? What ever you feel like that day.


8 a.m. – Light Breakfast

By now I'm usually pretty hungry, but I try to keep my breakfast on the smaller, lighter side. Avoid heavy, oily, raw, and sweet foods. Your meals should be easily digestible. Milk products, nuts, highly processed foods, red meat and wheat should be avoided, or taken in small quantity. Avoid alcohol, except for an occasional glass of dry red or white wine.
 
Great kapha-pacifying breakfast ideas include: 
- a fruit salad (with fruits like apples, pears, figs, apricots, berries, cherries, mango, persimmon, pomegranate, peaches, or quince), perhaps with a cup of tea
- stewed apples spiced with cinnamon and sweetened with raw honey
- spiced quinoa, buckwheat, polenta or millet porridge with stewed fruits (e. g. apples and pears), sprinkled with some warming spices such as ginger or cinnamon
- barley cereal
- a ginger turmeric smoothie with banana and mango (avoid frozen fruits!)
- chickpea flower pancakes, spiced with cumin and served with a salad
- a green smoothie packed with dark leafy green vegetables (e. g. spinach, stinging nettle, berries or apples or mango, wheat bran, mango juice or warm soy milk)

You may also have some green tea or black tea along with your breakfast, or 30 minutes afterwards. Another great beverage for spring is the detoxifying Ayurvedic CCF tea, which consists of equal parts of Coriander seeds, Cumin seeds, and Fennel seeds. Roast the seeds to bring out their fragrance, simmer in boiling water for 10 minutes, let cool for 5 minutes, then strain.

And after that, it's off to work – which in my case means: off to my desk in my home office where I'll usually spend the next hours until lunchtime!
 
Like I said in the beginning, I know this is quite a time-consuming morning routine, but to me it's more than that: It's a flexible part of my lifestyle and my lifelong health, so to me it's worth the time and effort if I do it, and I don't have to be perfect at it! Plus, many of us have been working from home for the past two years, which leaves more time to care for our bodies, minds and souls :)


♥

Maisy

Newer Posts Older Posts Home
View mobile version

THIS IS ME

Well, hello! My name is Maisy (pronounce: macy) and I’m the creative spirit behind this blog. You are welcome to join me on my journey to a more natural, slow-paced & healthier life!

SUBSCRIBE & FOLLOW

TRENDING THIS MONTH

  • DIY Easy Electroculture Plant Antenna
  • How To Marie Kondo Your Life (and not just your stuff)
  • Hot Wintry Butterbeer (vegan)
  • DIY Hair Growth Oil
  • DIY Yoni Oil | Feminine Hygiene Care

Categories

  • Ayurveda 17
  • beauty 39
  • breakfast 69
  • dessert 207
  • diy 48
  • fermenting 8
  • fictional food 21
  • foraging 30
  • gardening 8
  • gluten-free 115
  • healing 71
  • herbs 27
  • homestead 114
  • main course 35
  • minimalism 39
  • snack 106
  • sugar-free 110
  • zero waste 44
Powered by Blogger.

Archive

  • ►  2024 (3)
    • ►  September (1)
    • ►  March (1)
    • ►  January (1)
  • ►  2023 (22)
    • ►  December (2)
    • ►  November (1)
    • ►  August (1)
    • ►  July (1)
    • ►  June (1)
    • ►  May (4)
    • ►  April (3)
    • ►  March (3)
    • ►  February (3)
    • ►  January (3)
  • ▼  2022 (65)
    • ►  December (5)
    • ►  November (3)
    • ►  October (5)
    • ►  September (5)
    • ►  August (6)
    • ►  July (6)
    • ►  June (4)
    • ▼  May (6)
      • DIY Herbal Hair Rinse
      • Stuffed Hazelnut Leaves (vegan)
      • Homemade Dandelion Honee | Vegan Honey
      • Vegan Dandelion Cupcakes with cream cheese frosting
      • Easy Vegan Tiramisu Parfait
      • Ayurvedic Morning Routine | Spring Edition
    • ►  April (5)
    • ►  March (7)
    • ►  February (7)
    • ►  January (6)
  • ►  2021 (59)
    • ►  December (5)
    • ►  November (6)
    • ►  October (6)
    • ►  September (8)
    • ►  August (6)
    • ►  July (7)
    • ►  June (5)
    • ►  May (5)
    • ►  April (4)
    • ►  March (3)
    • ►  February (3)
    • ►  January (1)
  • ►  2020 (22)
    • ►  December (1)
    • ►  July (1)
    • ►  June (4)
    • ►  May (6)
    • ►  April (1)
    • ►  March (2)
    • ►  February (5)
    • ►  January (2)
  • ►  2019 (21)
    • ►  December (2)
    • ►  October (4)
    • ►  September (4)
    • ►  August (3)
    • ►  June (2)
    • ►  April (2)
    • ►  March (1)
    • ►  February (1)
    • ►  January (2)
  • ►  2018 (68)
    • ►  December (1)
    • ►  November (2)
    • ►  October (1)
    • ►  September (4)
    • ►  August (2)
    • ►  July (10)
    • ►  June (4)
    • ►  May (5)
    • ►  April (8)
    • ►  March (12)
    • ►  February (8)
    • ►  January (11)
  • ►  2017 (154)
    • ►  December (13)
    • ►  November (10)
    • ►  October (35)
    • ►  September (13)
    • ►  August (11)
    • ►  July (9)
    • ►  June (1)
    • ►  May (13)
    • ►  April (13)
    • ►  March (16)
    • ►  February (11)
    • ►  January (9)
  • ►  2016 (97)
    • ►  December (9)
    • ►  November (13)
    • ►  October (8)
    • ►  September (12)
    • ►  August (9)
    • ►  July (13)
    • ►  June (9)
    • ►  May (6)
    • ►  April (6)
    • ►  March (3)
    • ►  February (5)
    • ►  January (4)
  • ►  2015 (70)
    • ►  December (5)
    • ►  November (2)
    • ►  October (2)
    • ►  September (7)
    • ►  August (2)
    • ►  July (24)
    • ►  June (6)
    • ►  May (5)
    • ►  April (4)
    • ►  March (8)
    • ►  February (4)
    • ►  January (1)
  • ►  2014 (38)
    • ►  December (2)
    • ►  November (1)
    • ►  October (2)
    • ►  August (2)
    • ►  July (14)
    • ►  June (3)
    • ►  May (3)
    • ►  April (6)
    • ►  March (2)
    • ►  February (3)
  • ►  2013 (7)
    • ►  December (2)
    • ►  October (1)
    • ►  September (3)
    • ►  June (1)

SEARCH THIS BLOG


total page views

Most Popular Posts

  • DIY Easy Electroculture Plant Antenna
  • How To Marie Kondo Your Life (and not just your stuff)
  • Hot Wintry Butterbeer (vegan)

Privacy Policy


Copyright © Homestead Herbs & Healing | holistic living. Designed by OddThemes